The Content Editor can often be an intimidating piece of technology for Content Authors. Building new pages requires knowing how to manipulate the Presentation-Layout-Details, which in turn requires knowing how placeholders, renderings, and datasources work together. That’s why at TechGuilds we stress making Sitecore’s experience editor as friendly as possible for our clients, so that Content Authors are empowered to build pages the way they want them, and have the confidence to do so.
Sitecore has many out-of-the-box features for supporting the experience editor, such as custom buttons and edit frames. However, there are also some clever ways that you can extend the experience editor. One such way is to add custom “chrome” around placeholders and renderings so that they can be easily distinguished by the content authors.
Sitecore genius Jason Wilkerson outlined such a method in both his blog and the book “Professional Sitecore 8 Development,” and Kenneth McAndrew expanded on this idea in his own blog. I’m going to show you how to implement this in the basic Helix project we set up in my first blog post, How to Set up a Helix Project from Scratch.
First, we’re going to add a project folder in the “Foundation” folder of our Helix Solution. Call it “SitecoreExtensions,” and then create a new project inside it, following the directions in the “Making a Module in Helix” section of the aforementioned blog post - creating a corresponding folder in the file structure, renaming the project, adding the relevant Sitecore packages, etc. When you’re done you should have a project called [YourSiteName].Foundation.SitecoreExtensions. This is where we’re going to put Kenneth McAndrew’s code, albeit with a couple slight modifications.

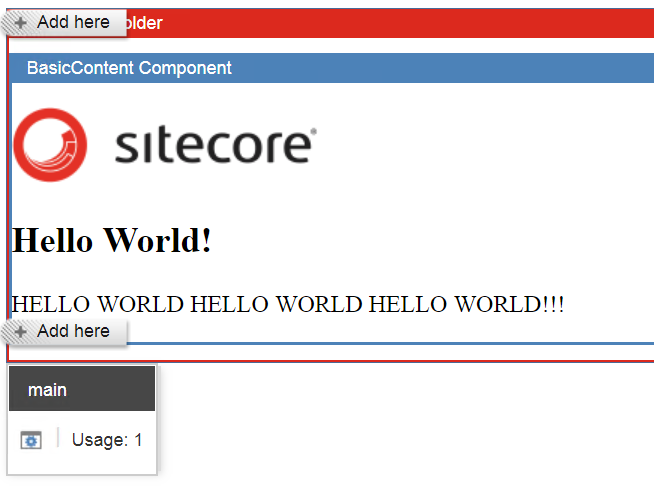
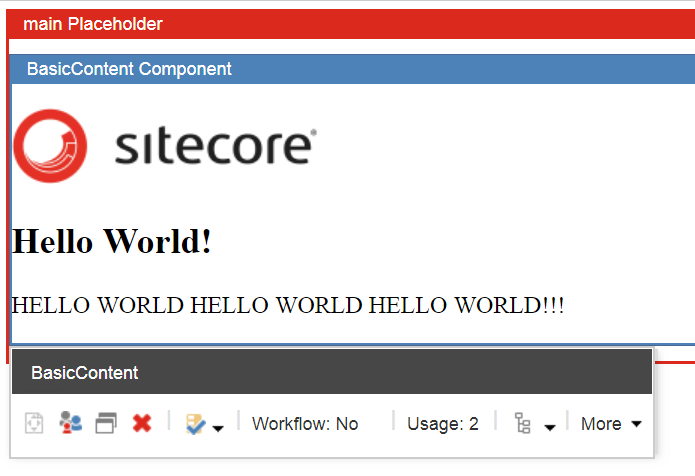
Before we get into the code, I’ll describe what it does. It’s actually pretty simple. The code uses Sitecore’s rendering pipelines to inject <divs> around placeholders and renderings while in the Experience Editor, then uses specific styling attached to those divs to clearly demarcate those placeholders and renderings. This styling creates headers for the placeholders and renderings that are easily clickable and in a clear hierarchy, so the user doesn’t have to click around blindly to find what they’re looking for.
So let’s go ahead and add the code. We’ll add the rendering code first, EditorRendering.cs. The following is the necessary code, modified a bit from what McAndrew did:
using System;
using System.IO;
using System.Linq;
using Sitecore;
using Sitecore.Data.Items;
using Sitecore.Mvc.ExperienceEditor.Presentation;
using Sitecore.Mvc.Pipelines.Response.RenderRendering;

namespace [YOURSITE].Foundation.SitecoreExtensions.RenderingWrapper
{
    public class AddEditorRenderingWrapper : RenderRenderingProcessor
    {
        public override void Process(RenderRenderingArgs args)
        {
            if (args.Rendered || Context.Site == null || !Context.PageMode.IsExperienceEditorEditing || args.Rendering.RenderingType == "Layout")
            {
                return;
            }

            IMarker marker = GetMarker(args);

            if (marker == null)
            {
                return;
            }

            args.Disposables.Add(new EditorRenderingWrapper(args.Writer, marker));
        }

        private IMarker GetMarker(RenderRenderingArgs args)
        {
            IMarker marker = null;
            RenderingItem renderingItem = args.Rendering.RenderingItem;

            if (renderingItem != null)
            {
                marker = new EditorComponentRenderingMarker(renderingItem.Name);
            }

            return marker;
        }
    }

    public class EndEditorRenderingWrapper : RenderRenderingProcessor
    {
        public override void Process(RenderRenderingArgs args)
        {
            foreach (IDisposable wrapper in args.Disposables.OfType<EditorRenderingWrapper>())
            {
                wrapper.Dispose();
            }
        }
    }

    public class EditorRenderingWrapper : Wrapper
    {
        public EditorRenderingWrapper(TextWriter writer, IMarker marker) : base(writer, marker)
        {
        }
    }

    public class EditorComponentRenderingMarker : IMarker
    {
        private readonly string _componentName;

        public EditorComponentRenderingMarker(string componentName)
        {
            _componentName = componentName + " Component";
        }

        public string GetStart()
        {
            return $"<div class=\"component-wrapper scRendering {_componentName.Replace(" ", string.Empty)}\"><span class=\"wrapper-header\">{_componentName}</span><div class=\"component-content clearfix\">";
        }

        public string GetEnd()
        {
            return "</div></div>";
        }
    }
}
In your [YourSite].Foundation.SitecoreExtensions project, create a folder called “RenderingWrapper.” Then create a new class inside that folder, and call it EditorRendering.cs. Go ahead and copy the above code into this blank class.
If you’re like me, at this point IntelliSense is telling you that it can’t find Sitecore.Mvc.ExperienceEditor. Go ahead and simply add this to your project using Nuget, making sure to install the correct version number (I also choose the .NoReferences version). Make sure to set Copy Local for this reference to False.
Next, we’re going to do the same thing for the placeholders. Create a folder in the SitecoreExtensions project called “PlaceholderWrapper.” Then create a new class in it called EditorPlaceholder.cs, and copy the following code:
using System;
using System.Collections.Generic;
using System.IO;
using System.Linq;
using Sitecore;
using Sitecore.Mvc.Extensions;
using Sitecore.Mvc.Pipelines;
using Sitecore.Mvc.Pipelines.Response.RenderPlaceholder;
using Sitecore.Mvc.Pipelines.Response.RenderRendering;
using Sitecore.Mvc.Presentation;

namespace [YOURSITE].Foundation.SitecoreExtensions.PlaceholderWrapper
{
    public class EditorPlaceholder : RenderPlaceholderProcessor
    {
        public override void Process(RenderPlaceholderArgs args)
        {
            Render(args.PlaceholderName, args.Writer, args);
        }

        protected virtual void Render(string placeholderName, TextWriter writer, RenderPlaceholderArgs args)
        {
            if (Context.PageMode.IsExperienceEditorEditing)
            {
               writer.Write($"<div class=\"component-wrapper scPlaceholder {placeholderName.Replace(" ", string.Empty)}\"><span class=\"wrapper-header\">{placeholderName} Placeholder</span><div class=\"component-content clearfix\">");
            }
            foreach (Rendering rendering in GetRenderings(placeholderName, args))
            {
                PipelineService.Get().RunPipeline("mvc.renderRendering", new RenderRenderingArgs(rendering, writer));
            }

            if (Context.PageMode.IsExperienceEditorEditing)
            {
                    writer.Write("</div></div>");
            }
        }

        protected virtual IEnumerable<Rendering> GetRenderings(string placeholderName, RenderPlaceholderArgs args)
        {
            string placeholderPath = PlaceholderContext.Current.ValueOrDefault(context => context.PlaceholderPath).OrEmpty();
            Guid deviceId = GetPageDeviceId(args);

            return args.PageContext.PageDefinition.Renderings.Where(r =>
            {
                if (!(r.DeviceId == deviceId))
                {
                    return false;
                }

                return r.Placeholder.EqualsText(placeholderName) || r.Placeholder.EqualsText(placeholderPath);
            });
        }

        protected virtual Guid GetPageDeviceId(RenderPlaceholderArgs args)
        {
            Guid guid1 = args.OwnerRendering.ValueOrDefault(rendering => rendering.DeviceId);

            if (guid1 != Guid.Empty)
            {
                return guid1;
            }

            Guid guid2 = (PageContext.Current.PageView as RenderingView).ValueOrDefault(view => view.Rendering).ValueOrDefault(rendering => rendering.DeviceId);

            return guid2 != Guid.Empty ? guid2 : Context.Device.ID.ToGuid();
        }
    }
}
The next thing to do is add the config that alters the rendering pipelines to include the classes we just added. In the App_Config folder in your project, create a folder called “Include.” In that folder, create another folder called “Foundation.” Finally, in that folder add a Web Configuration file (right-click folder, add -> New Item -> Web Configuration File) and name it Foundation.SitecoreExtensions.config. Copy the following code, replacing [YourSite] with the appropriate top-level namespace:
<configuration xmlns:patch="http://www.sitecore.net/xmlconfig/" xmlns:set="http://www.sitecore.net/xmlconfig/set/">
  <sitecore>
    <settings>
    </settings>
    <pipelines>
      <!-- Rendering/Placeholder Wrappers -->
      <mvc.renderRendering>
        <processor patch:after="processor[@type='Sitecore.Mvc.ExperienceEditor.Pipelines.Response.RenderRendering.AddWrapper, Sitecore.Mvc.ExperienceEditor']" type=" [YourSite].Foundation.SitecoreExtensions.RenderingWrapper.AddEditorRenderingWrapper, [YourSite].Foundation.SitecoreExtensions"/>
        <processor patch:before="processor[@type='Sitecore.Mvc.Pipelines.Response.RenderRendering.AddRecordedHtmlToCache, Sitecore.Mvc']" type="[YourSite].Foundation.SitecoreExtensions.RenderingWrapper.EndEditorRenderingWrapper, [YourSite].Foundation.SitecoreExtensions"/>
      </mvc.renderRendering>
      <mvc.renderPlaceholder>
        <processor patch:instead="processor[@type='Sitecore.Mvc.Pipelines.Response.RenderPlaceholder.PerformRendering, Sitecore.Mvc']" type="[YourSite].Foundation.SitecoreExtensions.PlaceholderWrapper.EditorPlaceholder, [YourSite].Foundation.SitecoreExtensions"/>
      </mvc.renderPlaceholder>
    </pipelines>
  </sitecore>
</configuration>
Next we’re going to add the all-important styling that visually separates renderings from placeholders from content. Being CSS, this is extremely easy to customize the way you want, so don’t hesitate to make it fit your or your content authors’ visual needs.
Create an “Assets” folder in your [YourSite].Foundation.SitecoreExtensions project, then add a stylesheet to that folder called mvcEditor.css. You can copy the following styling into this file:
body.edit-mode .component-wrapper {
    border: 2px solid #EEE;
    border-top: none;
    box-sizing: border-box;
    margin: 5px;
    overflow: hidden;
}

body.edit-mode .component-wrapper.scPlaceholder {
    border: 2px solid #DC291E;
    border-top: none;
}

body.edit-mode .component-wrapper.scRendering {
    border: 2px solid #4D82B8;
    border-top: none;
}

body.edit-mode .component-wrapper span.wrapper-header {
    background-color: #EEE;
    color: #111;
    display: block;
    font-size: 12px;
    font-family: Arial, sans-serif;
    height: 20px;
    line-height: 20px;
    padding: 0 10px;
    text-align: left;
}

body.edit-mode .component-wrapper.scPlaceholder span.wrapper-header {
    background-color: #DC291E;
    color: White;
}

body.edit-mode .component-wrapper.scRendering span.wrapper-header {
    background-color: #4D82B8;
    color: White;
}

body.edit-mode .component-wrapper .component-content {
    min-height: 20px;
}

body.edit-mode .component-wrapper .component-content .component-wrapper {
    margin: 10px 0;
}

body.edit-mode .mdl-container .mdl-locations-container .scEmptyImage {
    display: none;
}

body.edit-mode .scLooseFrameZone.scEnabledChrome {
    border: 2px solid #E08438;
}
This kind of styling may actually be better located in a separate theming project in the Foundation layer, as is the case in Habitat, but for the sake of expediency we’re going to put it here for now. When we publish, this file will end up in the ~/Assets/ folder in the web root.
Finally, we’re going to add a reference to the CSS in our Layout. Remember the Website project we made in the Project layer in my first blog post? Open up MainLayout.cshtml in [YourSite].Project.Website/Views/Layouts. We’re going to add a couple lines. First, add the following line in the <head> tag after the <title> in order to pull in the appropriate CSS file.
<!-- XPE-specific CSS -->
<link href="~/Assets/mvcEditor.css" rel="stylesheet" />
Next, we’re going to add a class to the <body> tag that only shows up if you’re in the Experience Editor. This is a great little trick that’s similar to our preferred way to handle rendering parameters (as opposed to writing markup in the backend, or injecting inline styling through Javascript or something). The opening <body> tag should look like the following:
<body class="@(Sitecore.Context.PageMode.IsExperienceEditorEditing ? "edit-mode" : string.Empty)">Regardless of whether you followed along with the first blog post to make our main layout file, if you want this placeholder and rendering chrome to work, any layout in question will need to pull in the correct stylesheet and have the correct class in the <body> tag.
The only thing left to do now is publish! If you followed my first blog post, you’ve already created a publishing profile for the Website project, but you’ll need to do the same thing for the SitecoreExtensions project. Publish both of these to the web root.
That should be it! When you click the Rendering header you should see the Rendering options, and when you click the Placeholder header you should see the “add here” buttons above and below whatever renderings are currently in the Placeholder.

To be Continued...
There are many ways to extend and improve the Experience Editor for your content authors, using both in- and out-of-the-box functionality. In blog posts to come, we'll cover how to further extend the experience editor through best practices, making sure that any new components and sites you make are fully editable outside of the content editor for your authors.