
In my two previous blog posts: Placeholder and Rendering Chrome and The Rendering Checklist, I walked through some methods for making the Experience Editor as user-friendly as possible. We want our content authors to be able to do whatever they need to from the Experience Editor, without having to go into the Content Editor. With that in mind, this week I want to talk about how to develop one component to create and render multiple Sitecore Items while having those items be editable from the XPE.
Some of the components you’ll create, such as carousels or accordions, may use multiple Sitecore items to display data. For example, a carousel might use one datasource item for data specific to the carousel (such as insert options or rendering parameters), then several child datasource items for the slides in the carousel. To develop this component, one approach would be to create a carousel rendering with a placeholder for slides, then a separate slide rendering that you could create and slide into the carousel placeholder. As long as you’re defining your datasource template for your slide renderings, this approach would allow you to create an infinite number of slide renderings and items.
But what if you wanted to cut out the middleman and create a single rendering for the carousel, eliminating the step of creating slide renderings? More importantly, how can you do that while being able to edit the slide items from the experience editor? The answer involves a combination of edit frames, experience editor buttons, and field renderers.
Making the Controller Rendering
For this post I’m going to create a version of the Bootstrap carousel that utilizes Sitecore. Feel free to follow along and by the end you’ll have your own working carousel for Sitecore!
The first thing you’ll need to do is create a new project in the Foundation layer of your Helix solution. I outlined the basic things you need to do when creating a project in a Helix solution in my first post, so refer back to that if you’re having trouble. I’m going to call this project TGBlog.Feature.Carousel.
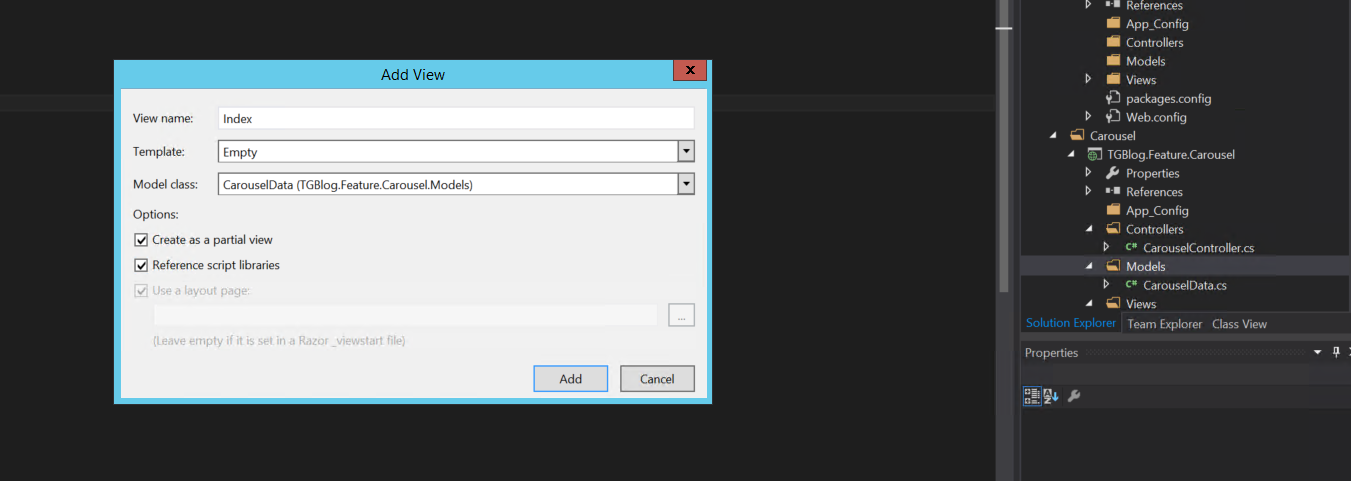
Next, I need to make a controller rendering both in visual studio and in Sitecore. I haven’t gone over how to make a controller rendering in these blog posts, so I’ll do that now. The first thing to do is right-click your “controllers” folder in your Carousel project and add a new empty controller.
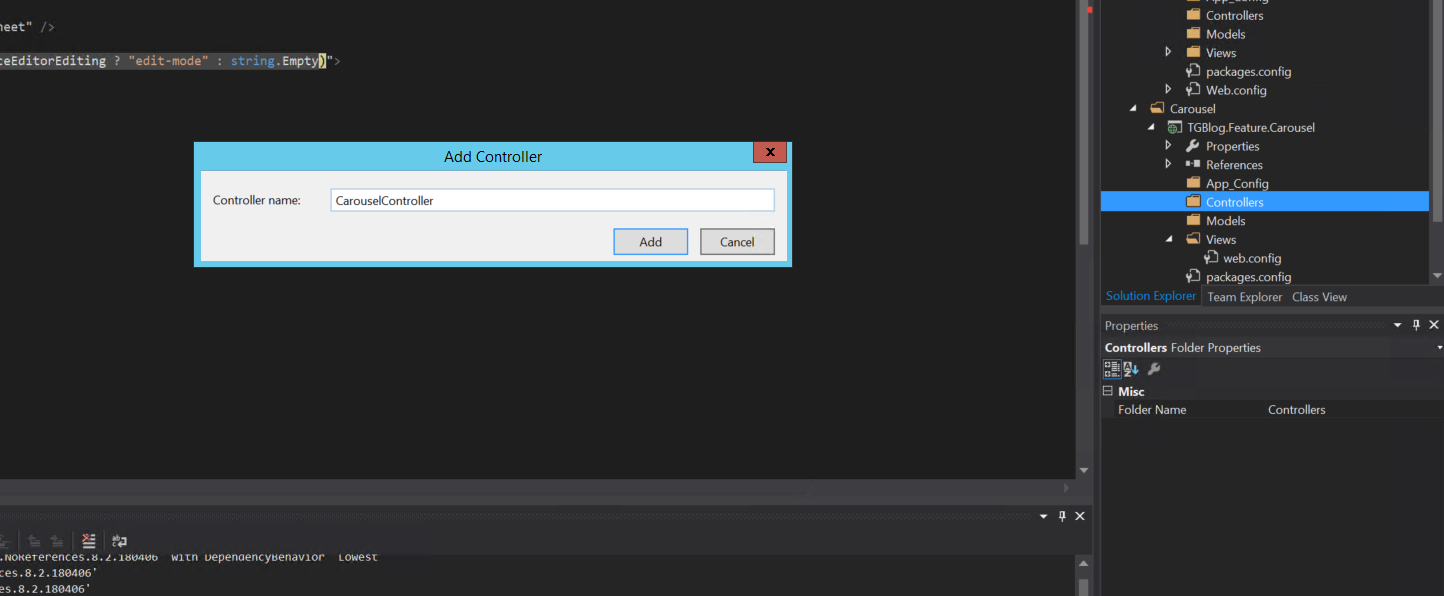
Name it “CarouselController”. It’s important that the “Controller” part stay in the name. Click okay and you’ll have a new controller. Sweet. Before we get into the code, let’s make the next two important ingredients in any MVC component: the model and view. Right click the model folder and add a new class, calling it “CarouselData.cs”. Finally, to create the view, go back to your controller. Where it says “return View();”, right-click “View()” then add view. In the Add View window that comes up, select “Empty” for Template, then select the “CarouselData” model class you just created for Model class. Finally, under options, check “Create as a partial view.” Click Add, and a folder under “Views” will be created in your project.
There may be some extra junk added to your project: a “Content” folder, a “fonts” folder, a “Scripts” folder, a “Shared” folder under the Views folder as well as a “_ViewStart.cshtml” view - delete all that stuff, you don’t need it. The only thing you need under views right now is a Carousel folder with an Index.cshtml view. The CarouselController you created knows to look in the Carousel folder under views, which is why it’s important that it’s called Index, to match the Index method in your controller.
Next, we’re going to hook up this controller rendering to Sitecore. This is fairly simple. In the Sitecore content editor, navigate to Sitecore/Layout/Renderings, right-click the “Feature” folder, and insert a new rendering folder, calling it “Carousel.” Right-click that folder and create a new controller rendering, also calling it “Carousel.” Underneath the Data section, type “Carousel” in the Controller field, and “Index” in the Controller Action field. Make sure to save.

Now when we’re done with the coding part and publish the Visual Studio project, we’ll be able to use the Carousel rendering in the Experience Editor.
Coding the Carousel
Now the fun part: we’re actually going to code the Carousel. Well, I am. You get to just copy and paste the code I write here. But I’ll explain some of it.
Because we’re altering Bootstrap’s carousel, we need to import Bootstrap first. We’re going to do this the easy and fun way, through a CDN in the <head> of the main layout. Bootstrap’s introduction page has a full explanation of how to do this, and I recommend you read that. However, for those of you who have been following along with my blog posts (see this one and this one, the relevant code for MainLayout.cshtml should look like this after adding the Bootstrap references:
MainLayout.cshtml
@using Sitecore.Mvc
@using Sitecore
@{
    Layout = null;
}

<!DOCTYPE html>

<html>
<head>
    <meta name="viewport" content="width=device-width, initial-scale=1, shrink-to-fit=no" />
    <title></title>
    <!-- Styling -->
    <link rel="stylesheet" href="https://stackpath.bootstrapcdn.com/bootstrap/4.1.3/css/bootstrap.min.css" integrity="sha384-MCw98/SFnGE8fJT3GXwEOngsV7Zt27NXFoaoApmYm81iuXoPkFOJwJ8ERdknLPMO" crossorigin="anonymous">
    <!-- XPE-specific CSS -->
    <link href="~/Assets/mvcEditor.css" rel="stylesheet" />
    <!-- Javascript -->
    <script src="https://code.jquery.com/jquery-3.3.1.slim.min.js" integrity="sha384-q8i/X+965DzO0rT7abK41JStQIAqVgRVzpbzo5smXKp4YfRvH+8abtTE1Pi6jizo" crossorigin="anonymous"></script>
    <script src="https://stackpath.bootstrapcdn.com/bootstrap/4.1.3/js/bootstrap.min.js" integrity="sha384-ChfqqxuZUCnJSK3+MXmPNIyE6ZbWh2IMqE241rYiqJxyMiZ6OW/JmZQ5stwEULTy" crossorigin="anonymous"></script>
</head>
<body class="@(Sitecore.Context.PageMode.IsExperienceEditorEditing ? "edit-mode" : string.Empty)">
    <div>
        @Html.Sitecore().Placeholder("main")
    </div>
</body>
</html>
Remember to publish.
Before we can continue, we need to define the data templates that this component will be rendering. In Sitecore, navigate to Sitecore/Templates/Feature, and create a new folder called “Carousel”. In the Carousel folder, create two new templates: “Carousel,” and “Slide”. For now, in the Slide template create a section called “Slide Data” with a single field of type Image called “Slide Image”.

Go back to your carousel rendering (/sitecore/layout/Renderings/Feature/Carousel/Carousel). Set the Datasource Template as the empty Carousel template you just created. This will help organize the content tree structure later.
To give a high level overview of what the code is going to do: in the controller, we’ll grab the datasource item of the current rendering (a Carousel item), then create a list of its children, which will be Slide items. We’ll create an object using the model class we created, attach the list of slide items to it, then send it to the view which will render the slide items.
First, we’ll make sure to designate what data is actually in our model. This is the simplest bit of code. It consists of one class with one property of type ChildList named SlideItems. This will be the list of Slide items that the view is rendering.
CarouselData.cs
namespace TGBlog.Feature.Carousel.Models
{
    public class CarouselData
    {
        public Sitecore.Collections.ChildList SlideItems { get; set; }
    }
}
Next, the controller. As I said before, the controller here grabs the Slide items from the datasource then sends them through a model class object to the view. Make sure you’re adding the model to the using declarations up top.
CarouselController.cs
using Sitecore.Mvc.Presentation;
using System;
using System.Collections.Generic;
using System.Linq;
using System.Web;
using System.Web.Mvc;
using TGBlog.Feature.Carousel.Models;

namespace TGBlog.Feature.Carousel.Controllers
{
    public class CarouselController : Controller
    {
        // GET: Carousel
        public ActionResult Index()
        {
            CarouselData CarouselModel = new CarouselData();
            Sitecore.Collections.ChildList SlideItems = null;

            //Get the current context, then datasource item
            var CurrentContext = RenderingContext.Current;
            var CurrentRendering = CurrentContext.Rendering;
            var Database = Sitecore.Context.Database;
            var DataSourceId = CurrentRendering.DataSource;

            //Create list of slide items underneath datasource item
            if (Database.GetItem(DataSourceId) != null)
            {
                var DataSource = Database.GetItem(DataSourceId);
                //Ideally you'd actually loop through these to verify against Slide template ID and populate a separate list then bind that to model object
                SlideItems = DataSource.GetChildren();
            }

            CarouselModel.SlideItems = SlideItems;

            return PartialView(CarouselModel);
        }
    }
}
Finally, the most important part for this particular post: the view. As I said above, we’ll be modifying Bootstrap’s carousel code. If you simply paste this into the view you have right now, give the <img> tags some actual sources, and publish, you should see a working bootstrap carousel. We’re going to edit the code to render slide items and allow the user to change the images presented.
Index.cshtml
@model TGBlog.Feature.Carousel.Models.CarouselData

<script>
    $(document).ready(function () {
        //make first slide and indicator appear/active
        $('#TGBasicCarousel').find('.carousel-item').first().addClass('active');
        $('#TGBasicCarousel .carousel-indicators').find('li').first().addClass('active');
    });
</script>

<div class="CarouselWrapper">
    <div id="TGBasicCarousel" class="carousel slide" data-ride="carousel">
        <ol class="carousel-indicators">
            @for (int i = 0; i < Model.SlideItems.Count; i++)
            {
                <li data-target="#TGBasicCarousel" data-slide-to="@i"></li>
            }
        </ol>
        <div class="carousel-inner">
            @for (int i = 0; i < Model.SlideItems.Count; i++)
            {
                <div class="carousel-item">
                    @if (Model.SlideItems[i] != null)
                    {
                        @Html.Sitecore().Field("Slide Image", Model.SlideItems[i])
                    }
                </div>
            }
        </div>
        <a class="carousel-control-prev" href="#TGBasicCarousel" role="button" data-slide="prev">
            <span class="carousel-control-prev-icon" aria-hidden="true"></span>
            <span class="sr-only">Previous</span>
        </a>
        <a class="carousel-control-next" href="#TGBasicCarousel" role="button" data-slide="next">
            <span class="carousel-control-next-icon" aria-hidden="true"></span>
            <span class="sr-only">Next</span>
        </a>
    </div>
</div>
Simple enough. As you can see if you looked at the Bootstrap Carousel code, I’ve simply replaced the sample slides/indicators with for loops that create the necessary markup for every given Slide item. I also threw in a bit of jquery to make sure that the “active” class was added to the first slide and indicator, to make sure the carousel displayed correctly.
At this point you should have a working Carousel that renders however many Slide items you have under the Carousel item in the content tree, and whose images you can edit from the Experience Editor. However, this isn’t yet optimized for the Experience Editor. That’s where edit frames come in.
Adding Edit Frames and Buttons
Right now, you can create Slide items in the content editor under the Carousel item, and they’ll render, but we want to be able to do everything from the Experience Editor. So we need to create edit frames and use some experience editor buttons.
The edit frames are actually fairly simple. Sitecore has some useful documentation around them on their website. You simply pass as parameters the path to the item being rendered, the GUID of the edit frame button folder you’re using, a title, a tooltip, and a couple other options if you want. We’re going to wrap our slides in edit frames.
First though, we’re going to create some edit frame buttons. SXA comes with some new ones out of the box, but they leverage Sitecore’s existing webedit javascript in a way that you should also be able to without SXA.
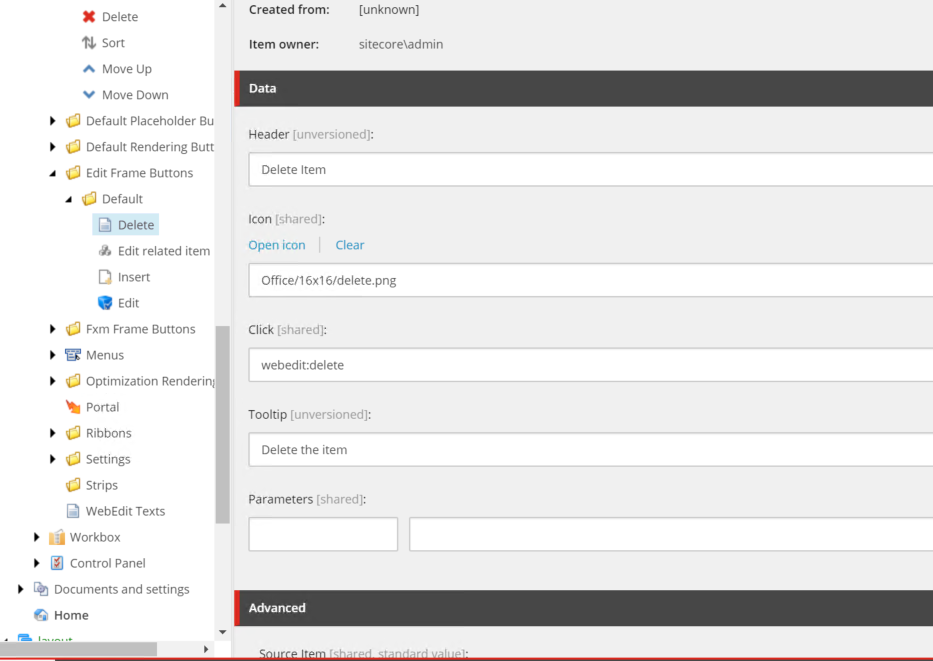
To create new edit frame buttons, navigate to the core database, then to Sitecore/content/Applications/WebEdit/Edit Frame Buttons. I’m putting my buttons in the Default folder, which for me has a guid of {FF3A53EE-195C-40B5-A3E4-AE0D2B8DE203}. To create a new button, right-click the folder and insert an Edit Frame Small Button. For now, I’m just going to create a delete button by simply adding webedit: delete to the Click field. Some other functions you can use: item:moveup, item:movedown, item:movefirst, item:movelast.
Next we’ll add the edit frames around our slide markup. This part is easy.
Like so:
<div class="carousel-inner">
            @for (int i = 0; i < Model.SlideItems.Count; i++)
            {
                using (Html.EditFrame(Model.SlideItems[i].Paths.FullPath, "{FF3A53EE-195C-40B5-A3E4-AE0D2B8DE203}", "Slide Item", "Edit Slide Item", null, null))
                {
                    <div class="carousel-item">
                        @if (Model.SlideItems[i] != null)
                        {
                            @Html.Sitecore().Field("Slide Image", Model.SlideItems[i])
                        }
                    </div>
                }
            }
        </div>
One more addition may be necessary, as it was for me in this case: you may need to make the edit frame itself more visible. This is a simple styling change, which I added to the css for the rendering/placeholder chrome I explained in a previous post:
/*edit frame extension*/
body.edit-mode .scLooseFrameZone.scEnabledChrome {
border: 10px solid #E08438;
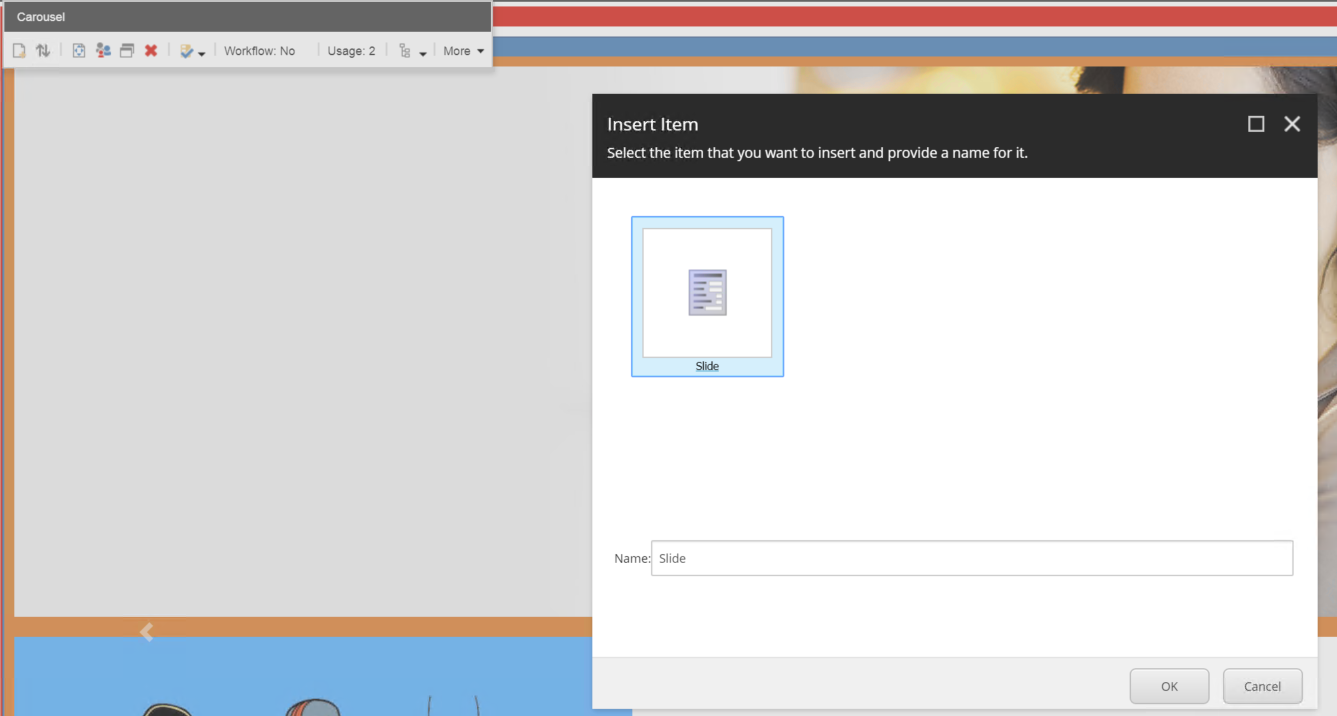
}Now we have edit frames around our slide renderings!

As you can see in this picture, you can delete the item in question, insert a new item (assuming insert options are defined), and edit fields in the item (as long as they’re defined in the “Fields” field of the “Edit” field editor button). However, we still need to be able to add slide items from the carousel component in the XPE, and it would be able to sort the slides too.
We can add the aforementioned functionality by adding experience editor buttons to the carousel rendering. Back in the master database, navigate to the Carousel rendering. Under Experience Editor Buttons, add “Insert” and “Sort” to the selected list. For “Insert” to work, we need to define an insert option for the Carousel. In the Carousel template, scroll down to the Insert Options section and choose the Slide template. Now you should be able to add and sort slides by clicking on the Carousel Component (note that if you already added a Carousel item underneath the home node you have to do this in the item as well).
Separating the slides
There’s one more thing we can do to make this particular component more experience editor friendly. As it is, the user can’t navigate through the slides and edit every single one - the experience editor javascript seems to get in the way of the bootstrap. A simple solution is to simply stack the slides while in the experience editor. The easy way to do this is to add the “active” class to every slide if in experience editor mode. We can do this in the markup, by adding the following line of code directly in the class of the carousel-item div.
@if (Sitecore.Context.PageMode.IsExperienceEditor){string s = "active";@s;}And now the carousel slides stack on top of each other where they can be edited individually:

Now you’re able to create renderings that render multiple XPE-friendly child items! Make sure that you go through our Rendering Checklist for the Carousel rendering. I hope this guide has been helpful. Next up, I’m going to explain how to extend a popular implementation of Dynamic Placeholders so that you can combine them with the functionality explained in this blog post.