
In Back to Basics: Part 1, we covered the basics of creating a new Sitecore instance with Helix architecture scaffolding. In Part 2, we covered using Gulp to build aspects of our solution that were spread across multiple projects. Now that we know how to build a Helix solution, we need to make it ready for collaboration.
Yes, I’m talking about DevOps.
Version control is obviously an important part of any software solution. However, a Sitecore solution provides some unique challenges to version control. Any given component in Sitecore exists both in the code AND in the database. If you want one of your coworkers to have the new feature you just created, simply committing your code to the Repo isn’t enough - you also need to find a way to get your Sitecore items over to their Sitecore instance.
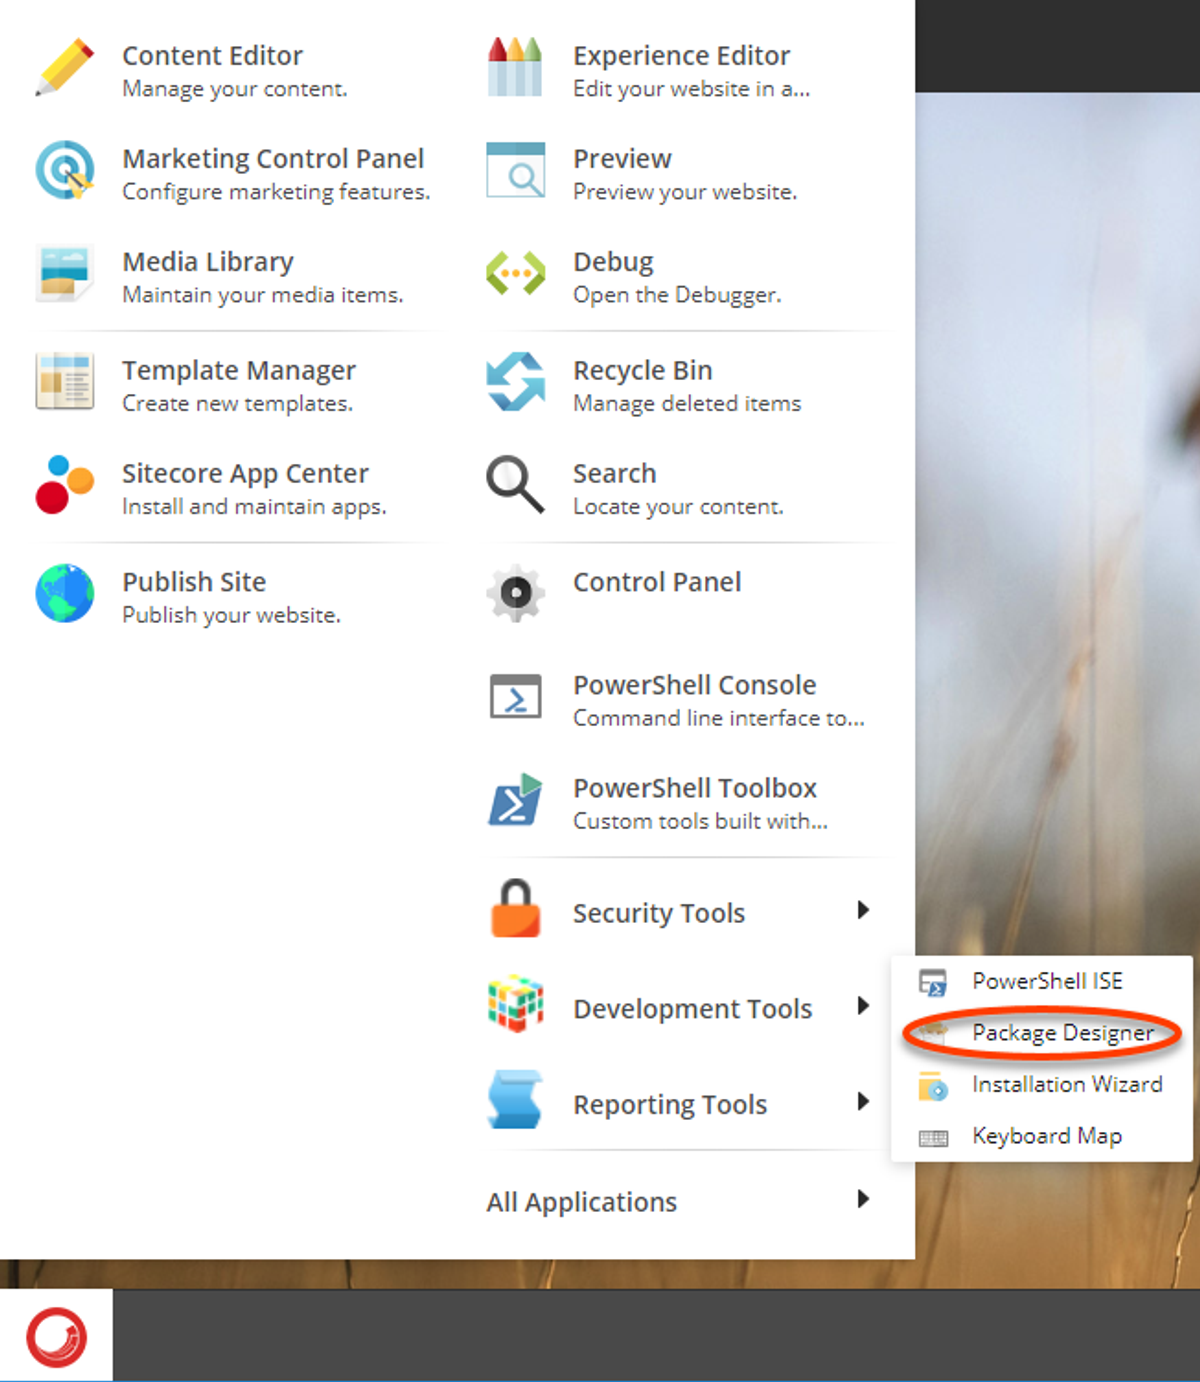
The easiest way to export Sitecore items such as templates, renderings, settings, and other kinds of content is to simply create a package. The Package Designer wizard will let you select whichever Items/Nodes you want to export, and creates a zip package. You then install this package on the desired Sitecore instance using the Installation Wizard.
However, as simple as it is to use the Package Designer and Installation Wizard, it can take some time and for a big project the overhead will simply be too expensive. The better solution is to use serialization.
Serialization
In Sitecore, items in the content tree can be “serialized,” meaning they can be converted into text files that are easily shared. Those text files look something like the following:
----item----
version: 1
id: {8B468800-BBCB-4298-AEE5-3CD36CE049F8}
database: master
path: /sitecore/content/Microsites/Home
parent: {360A66E5-5DBF-461D-877A-E430FC4E1995}
name: Home
master: {00000000-0000-0000-0000-000000000000}
template: {A8BA95CB-949E-4F91-BDC2-F33AA0FA600B}
templatekey: Home
created: 20180524T203741Z
----field----
field: {F1A1FE9E-A60C-4DDB-A3A0-BB5B29FE732E}
name: __Renderings
key: __renderings
content-length: 1033
The process of Serialization and Deserialization/Updating is fairly straightforward. In your web root, there’s a Data folder and a Website folder. In the Data folder, there’s a folder called “Serialization” that contains folders corresponding to the databases in the project. In these database folders, the Sitecore content tree is represented (serialized) as nested folders and text files, with every parent node being split into both a text file (for the corresponding sitecore item) and a folder containing its child nodes (which themselves may be a text file and a folder, or just a text file). Simply: serialization converts the content tree from the database into folders and text files and stores them in the ‘serialization’ folder.

There are a few ways to manually serialize Sitecore items directly from the content editor. The easiest way is to simply click on the item in the content tree of the content editor, and click “serialize item”. After processing, you’ll see the text file and any folders in the Serialization folder. Once an item (or item tree) from one Sitecore instance is serialized, you can copy the serialized folder/text files into the serialization folder of the target Sitecore instance. Then, you can choose to “update,” which will merge the serialized items with the current ones in the instance, or you can “revert”, which will erase all changes and items that aren’t represented in the serialization folder.
Through this method of serializing items and moving them from one instance’s “Serialization” folder to another, you can transfer content between Sitecore instances in large batches, making for a less arduous process than creating packages and installing them. However, one major challenge remains: keeping track of which items have been changed.
Setting up Team Development for Sitecore
This is where Team Development for Sitecore comes in. TDS, as it’s commonly called, is a tool for committing and pushing content to a repo the same way we do code. At TechGuilds we use it so multiple developers can work on different aspects of a project at once. It allows you to track all of your .net code and Sitecore content changes in one master repository (in TDS’s terms: a Source Control Management System, or SCMS). Not only does TDS allow you to back up your content as you would your code, but it also allows you to compare incoming changes to that content from other developers. (Note: The other well-known competitor to TDS is Unicorn. However, Sitecore just announced they’re going to buy TDS.)
To set up TDS, you’ll want to follow their step-by-step instructions in the TDS documentation. You’ll have to buy it, but there is a free trial available for TDS classic. The installation process is fairly simple - just make sure you’re installing TDS for the proper version of Visual Studio.
After installation, we can start putting TDS to work. I’m going to show you how to add a TDS project to our Helix structure then deploy multiple TDS projects using a “bundle.”
First, the basics: in our Helix solution in Visual Studio, we should see multiple project folders between our Foundation, Feature, and Project layers. We’ll want to add a TDS project to any of the projects that have corresponding Sitecore items, such as renderings and templates. In our case, any one of our projects has corresponding Sitecore items.
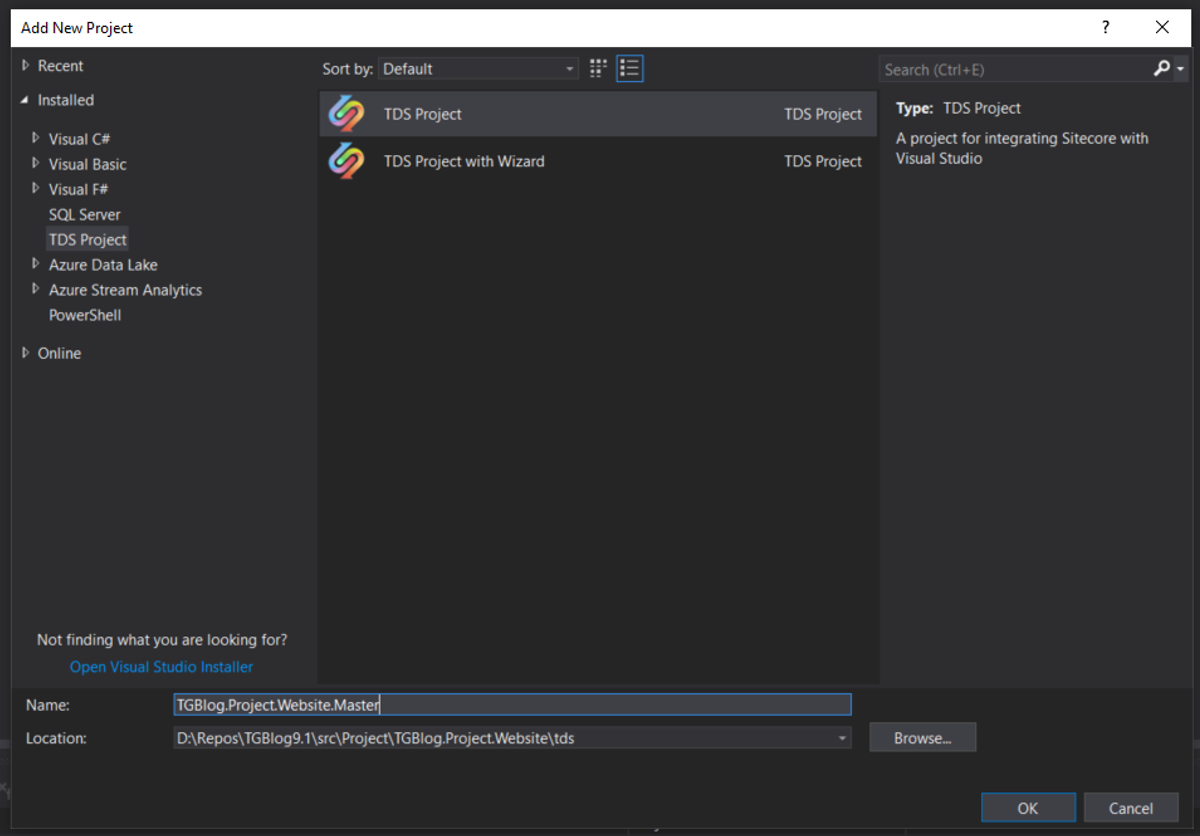
Right-click the project folder in question, then select add -> new project. In the “Add New Project” window, you should see options for TDS projects on the left. Select “TDS Project.” For the name, we’re going to name it after its corresponding VS project. However, there may be multiple TDS projects per project folder, and they may each serve different roles. Master projects contain relevant templates and renderings. Content projects contain non-architectural pieces of content that may use the aforementioned templates and renderings. Finally, Bundle projects link together multiple TDS projects so the user can deploy everything at once.
Since we’re making a TDS project for the TGBlog.Project.Website project, we’ll name it TGBlog.Project.Website.Master. For its location, we’ll save it in src/Project/TGBlog.Project.Website/tds. This way, the “tds” folder lives alongside the “code” folder, and Helix architecture standards are maintained.
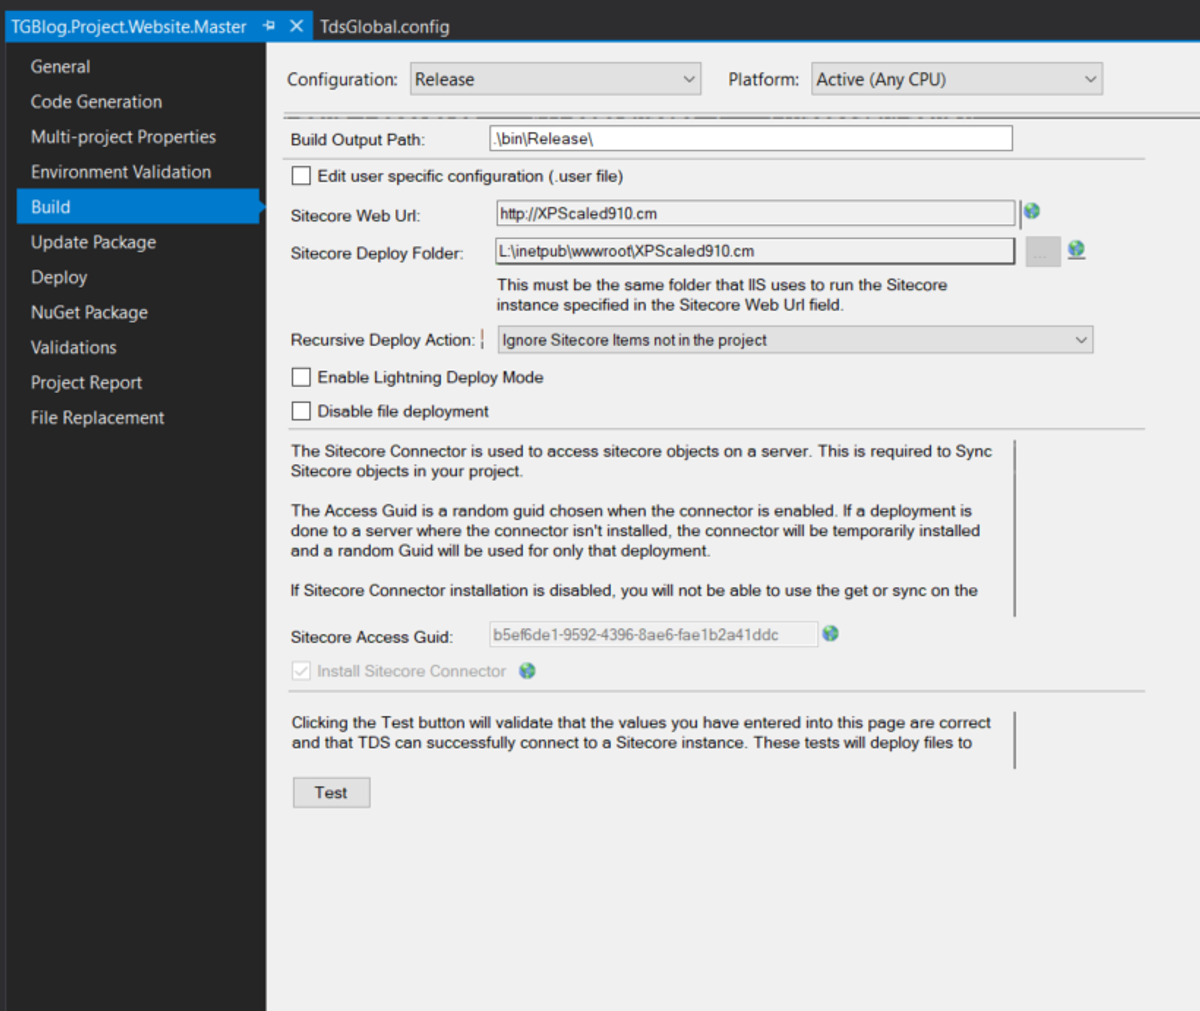
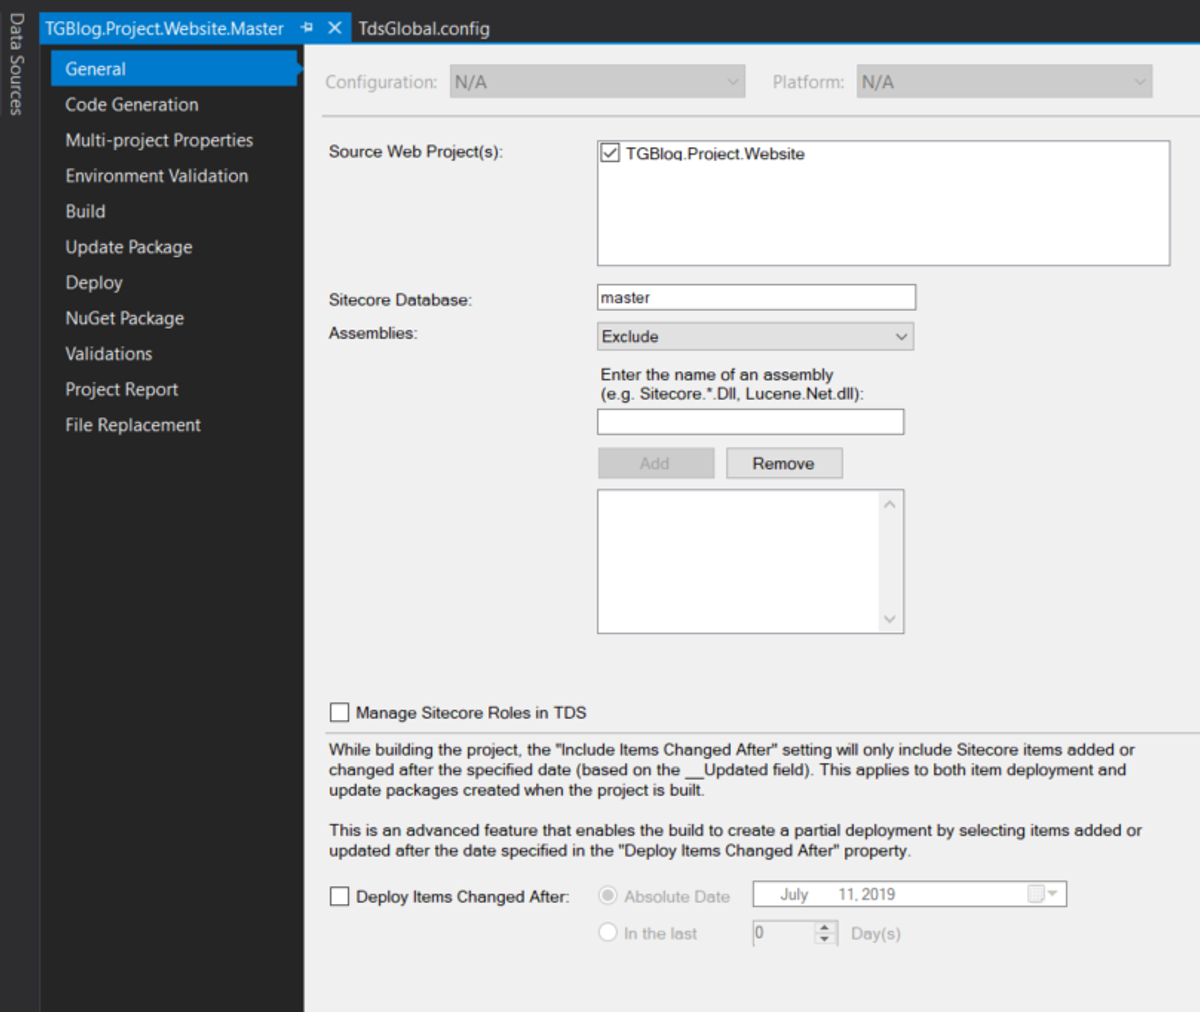
Now we need to actually connect our TDS project to Sitecore so we can start tracking Sitecore items. To do so, right-click on the TDS project, select properties, then navigate to the Build tab.
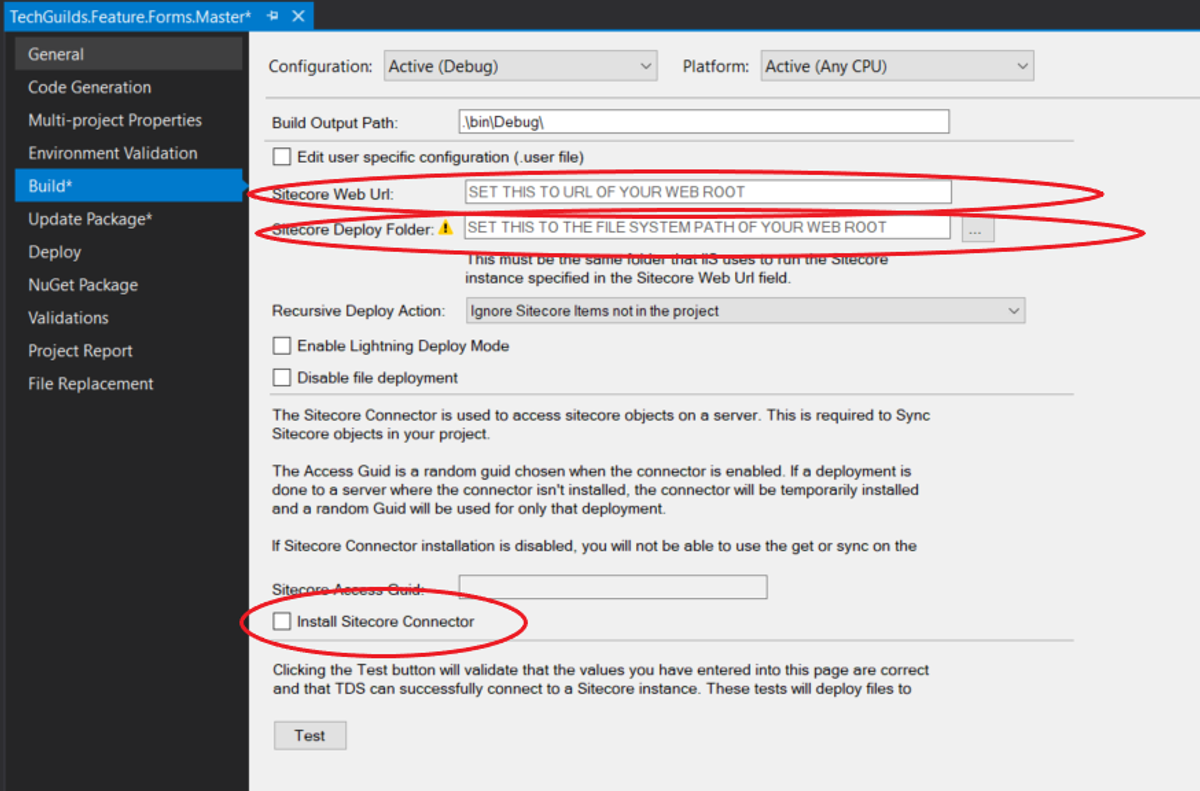
In the TDS project properties, you’ll need to set the Sitecore Web Url, the Sitecore Deploy folder, and check “install Sitecore Connector” to connect to Sitecore. The Web Url should be the host name of your sitecore instance (check your bindings in IIS for accuracy). The deploy folder is your Sitecore instance’s web root. Also, you need to enter a valid build output path. (You may want a custom build output path for each configuration, but more about configs in a second.) After you’ve entered these values, click the “test” button to make sure the connection is secure.
Now, you’re not going to want to have to change these settings for every single TDS project you create, so you’ll want to create a global config item. Doing so is easy: right-click the solution in the solution explorer and select Team Development for Sitecore -> Add Global TDS Config file. When you do so, a file called TdsGlobal.config will be added to the solution. This file will be mostly commented out.

We want to standardize the addresses for the Web URL and the Deploy folder. To do so, we’ll need to create or fill out a <PropertyGroup> section. Each <PropertyGroup> section in the config is connected to a build configuration, such as debug, release, or whatever custom configs you might have. For this example we’ll fill out the ‘Release’ section.
First you’ll want to uncomment <SitecoreWebUrl>, <SitecoreDeployFolder>, <InstallSitecoreConnector>, and <SitecoreAccessGuid>. We’re going to populate these fields with the same information we put into the “Build” tab of the TDS project properties page. You can get the Access Guid by returning to your TDS project’s build tab and checking the “Install Sitecore Connector” box. When you do, the above “Sitecore Access Guid” field will populate with a random GUID, which you can copy and paste into the config.
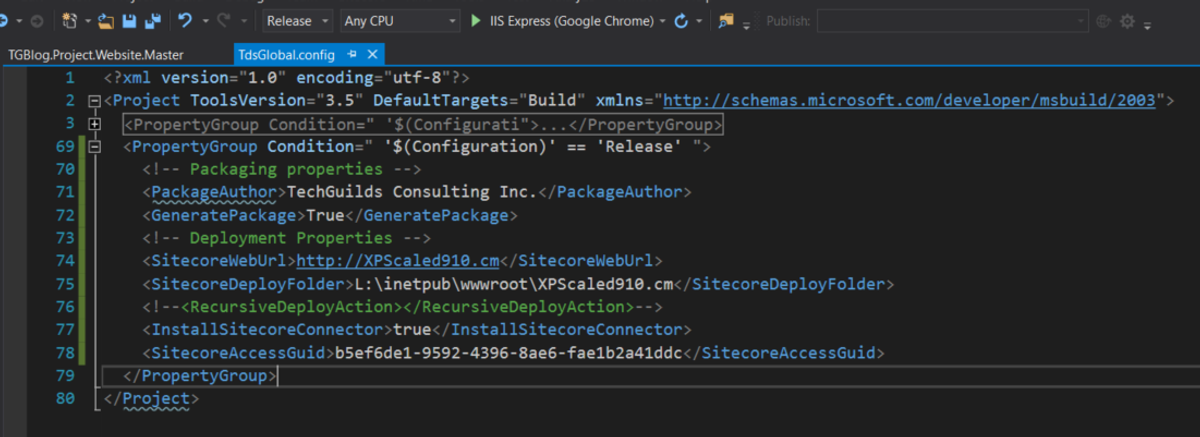
After you’ve created the settings for the chosen Solution Configuration, save. Now, go back to your TDS project properties’ build page. Make sure the Configuration setting in the top left is set to the Property Group settings you created in TdsGlobal.config. When the build page is set to the right config, you should see the settings you filled out in the config file, with an icon of a globe to the right of each field.
Now, any time you create a new TDS project, the build settings should be pre-set. Thanks, global config file!
Getting and Syncing Items
Finally, we’re going to get to use TDS for its intended purpose: tracking Sitecore items that correspond to our code. There are two relevant processes you need to be aware of.
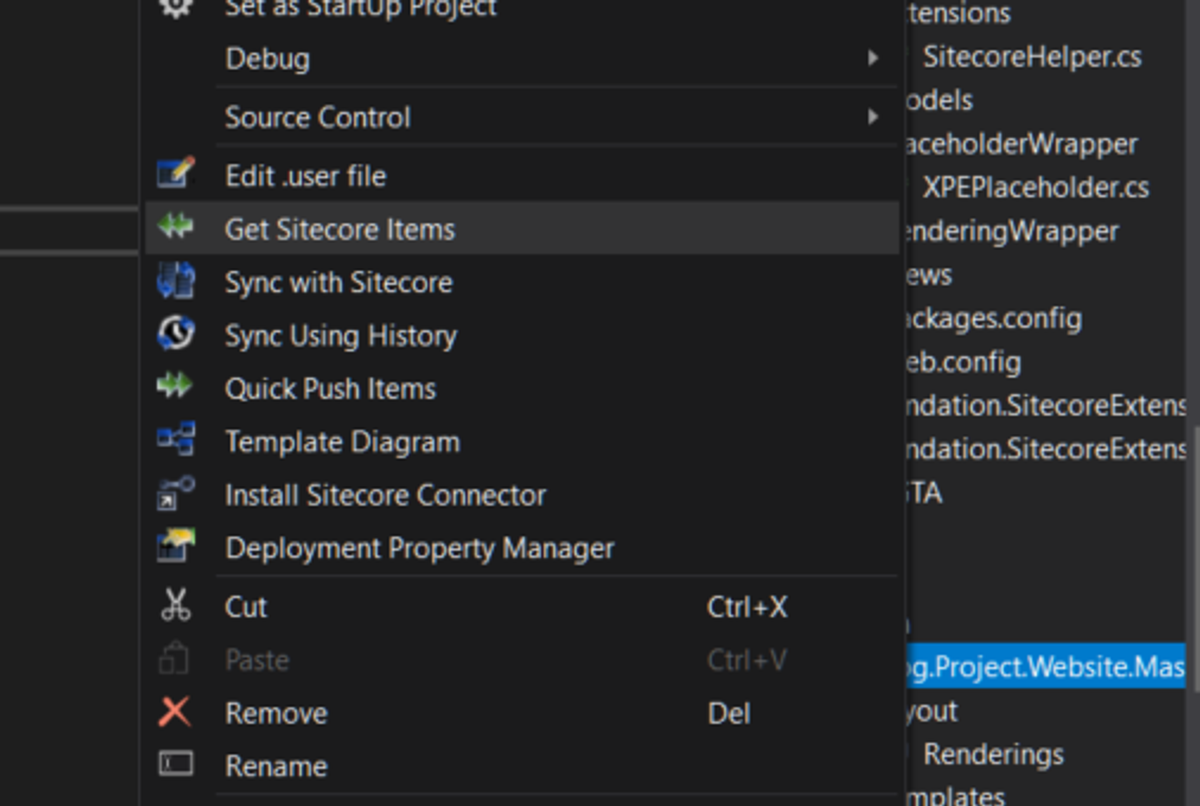
The first TDS process you’ll end up using regularly is the “Get Items” process, in which you simply navigate the content tree and select the Sitecore items you want to track in your TDS project.
Right-click on your TDS project and select “Get Sitecore Items.”
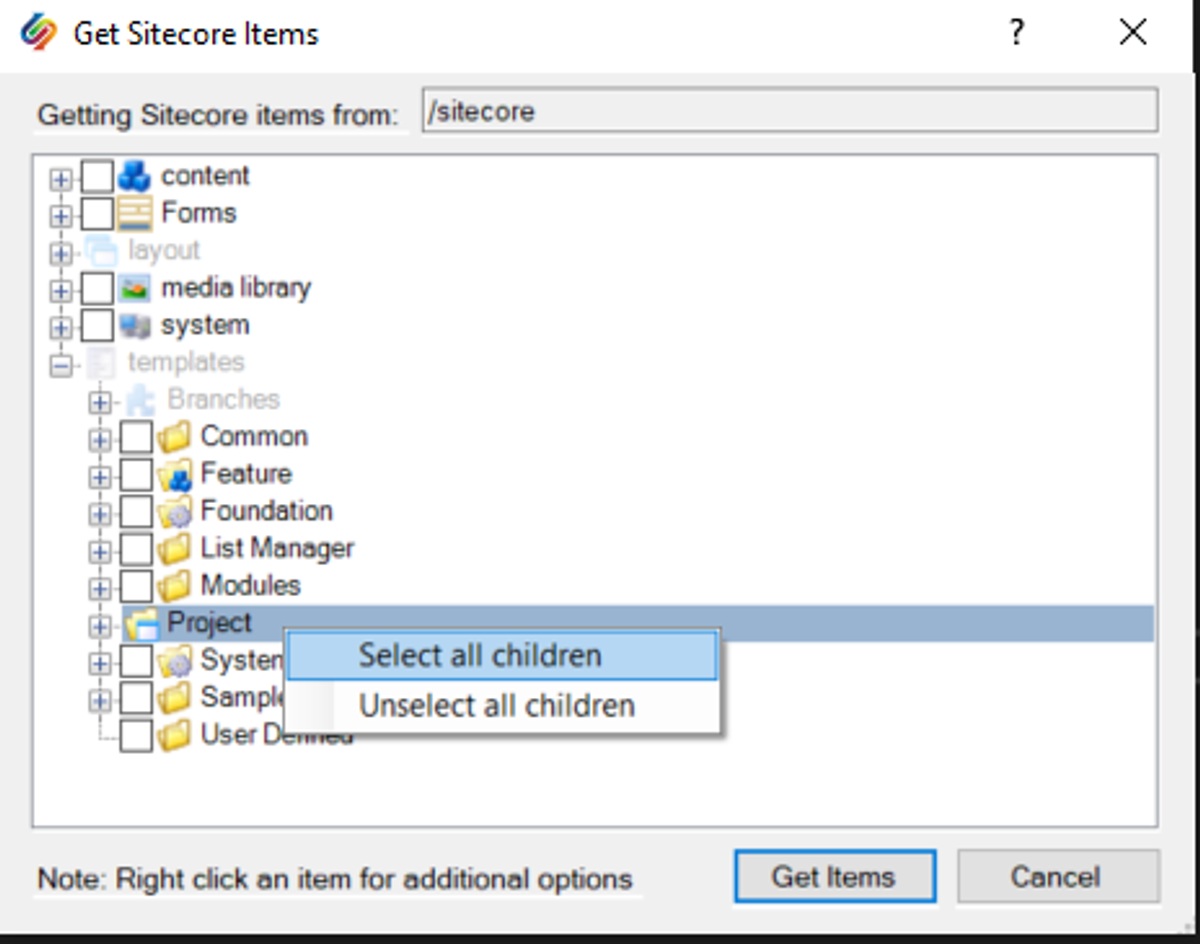
From the next window, you can choose which items to track in your TDS project by either checking the box next to them or right-clicking a node and selecting “Select all Children.”
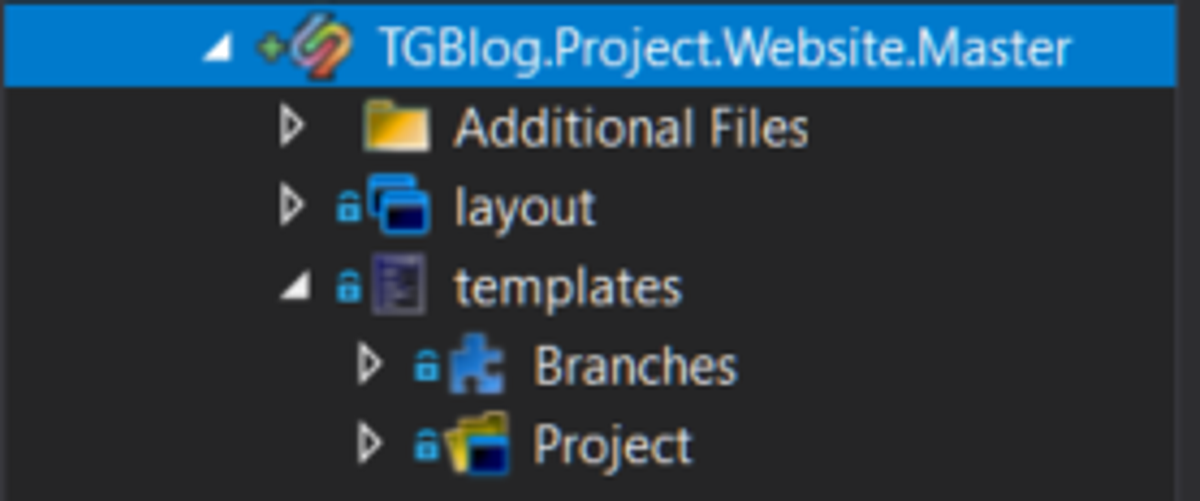
In the Solution Explorer, you should now see your tracked items underneath your TDS project when expanded. To stop tracking an item, simply delete the node from the tree under the TDS project.
That’s how to start and stop tracking items in your TDS project! However, you’ll also need to sync your items whenever you update them - this is the main strength of TDS.
Syncing is about as easy as grabbing items in the first place. First, right-click your TDS project and select “Sync With Sitecore.” You’ll then see the Sync screen, along with any changes to the items tracked in your TDS project. If the items in Sitecore or your project don’t match, you can choose to either update the project or update your Sitecore instance. If you make a change on Sitecore, you’ll want to update your project, and if you’re taking a change from the source control, then you’ll want to update Sitecore.
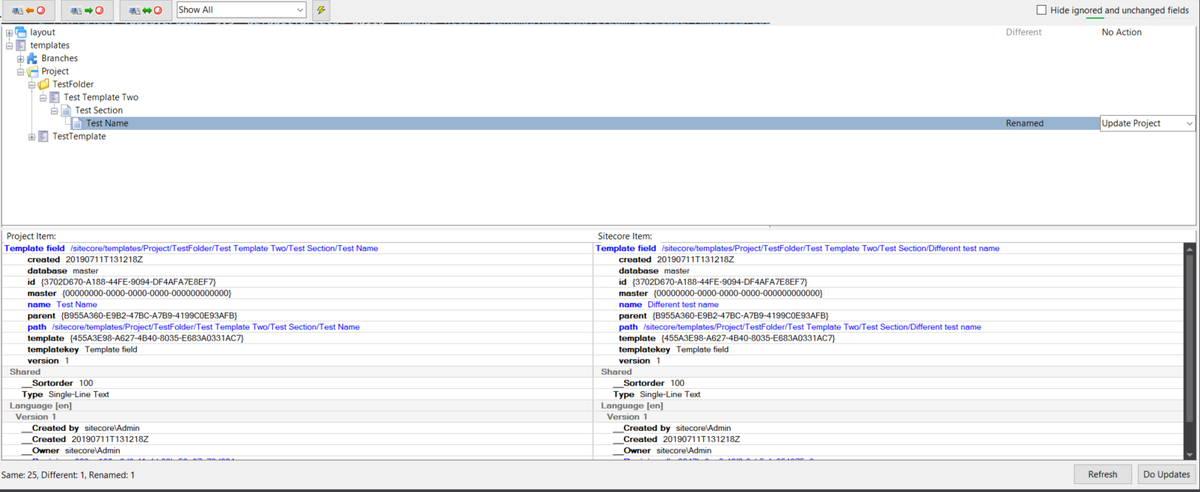
Click “Do Updates” and both your TDS project and Sitecore instance will be updated with whatever changes you decided to commit.
Between Getting Sitecore items to track and updating those items with the Sync feature, you should now have some TDS information to commit to your source control. If you’re using a Git client like GitKraken, you should also see the individual serialized Sitecore items in the project now.
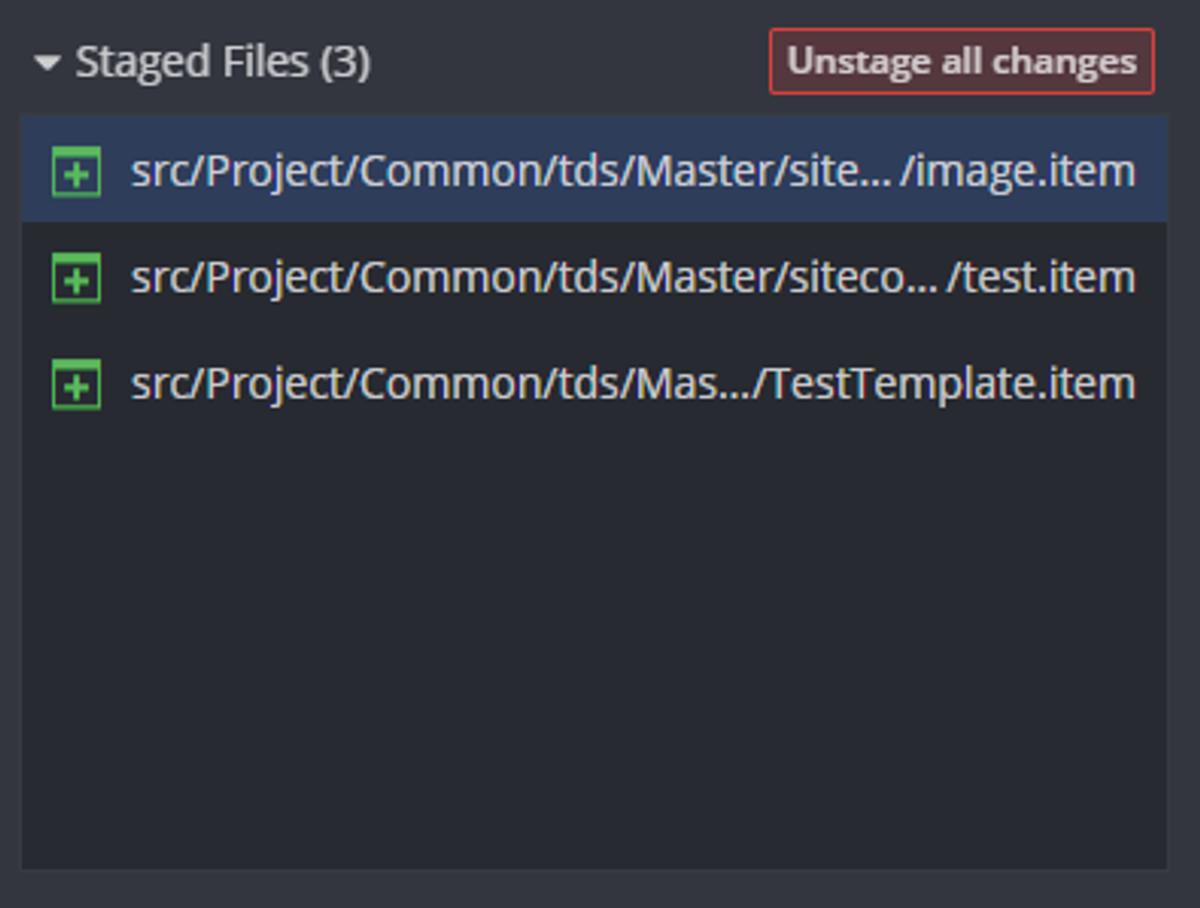
These serialized items are what you’ll ultimately push back to your source repo, and you’ll receive changes the same way. However, now you have a new problem: how do you keep track of and deploy all of these Sitecore item changes?
Deployment and Architecture
There’s not one right way to do architecture. At TechGuilds we always try to use Helix principles as our guide when it comes to architecture, splitting our solution into Foundation -> Feature -> Project layers, with each layer depending on the last. In the VS solution we have multiple projects per layer, with the Feature project most commonly holding our components, the Project layer holding our layout and styling data, and the Foundation layer holding universal standards and any modifications or extensions we may make to Sitecore itself.
We organize our data in the Sitecore content editor the same way, with Templates, Layouts, and other essential folders all having Foundation, Feature, and Project folders. This division makes it easier for us to track our items in a TDS project. For example, if I have a TDS project in the Feature layer that tracks a specific component’s relevant Sitecore items, I know to look for them in the Feature sub-folder in the “Templates” and “Layouts” sections.
However, all of this stuff can quickly become difficult and costly to track. Developers may find themselves asking other developers exactly which Sitecore items they need to update or delete from the project.
Enter Bundles. Bundles allow users to deploy their entire project at once, including every TDS and Visual Studio project. Ideally you would do this once any time you pulled down new code or merged it into your branch.
Before we set up a bundle though, we need to make a couple other changes.
First, in order to deploy code along with our TDS items, we need to link a web project to our TDS project. In the properties page of our TDS project, we’ll select the corresponding VS project in the “Source Web Projects” field.
One more thing: You’ll need to make sure that TDS can reach the proper assembly DLLs. You can either do this through setting the path in the “Sitecore Assembly Path” field on the “Update Package” tab in the TDS properties, or you can use Nuget Package Manager to include references to Sitecore.Update, Sitecore.Logging, and Sitecore.Zip in your solution.

Finally, you can use TDS to help build your project. With the TDS project linked to the web project, you can simply right-click the TDS project and click “build” to deploy your linked VS project(s). If you right-click the TDS project and click “deploy,” it’ll use the Sitecore connection you set up to deploy the Sitecore Items you’re tracking through TDS as well.
Now that we know how to link our TDS projects to our VS projects to make deployment simpler, we’ll make the final step of bundling everything together.
First, make a new TDS project. This will be our bundle project. I’m going to put mine in the same place as our other project, in the Project folder, and I’m going to call it TGBlog.Project.Website.Bundle. Open the properties for this bundle project and navigate to the “Multi-project Properties” tab. At the bottom of this screen you’ll see a field called “Package Bundling.” Here you’ll simply include every TDS project you want to be included in your bundle.
(You can also take the time to add any stray visual studio projects to the “Source Web Projects” field in the “General” tab. You would do this if you had a project you wanted to include in the bundle that didn’t have a corresponding TDS project and/or wasn’t brought in through a dependency reference.)
Once the Bundle project is set up correctly, you can Build or Deploy with it the same way you would any other TDS project, only the Bundle will build and deploy EVERYTHING.
Conclusion
And that’s how you use the basic features of TDS! Today I showed you how to install TDS, how to set it up, how to track and sync Sitecore items with it, and how to make a bundle to deploy your project. Please let us know if you have any questions or comments!
If this is the first post you’ve read in this series, you can also read the following for more information:
Back to Basics, Part 1: Setting up a Sitecore Helix Solution from Scratch
Back to Basics, Part 2: Sitecore Helix Styling with Gulp
In this series
Back to Basics - How to Set up a Sitecore Helix Solution from Scratch Back to Basics, Part 2: Sitecore Helix Styling with Gulp Back to Basics, Part 4: Sitecore Rocks