
Back in July I made my first blog post for TechGuilds, called “Back to Basics,” covering how to set up a Sitecore project according to Helix architectural principles. That post, while serving as a foundation for most of my other blog posts, was meant to be the first in a series. Today I’m going to continue that series with part 2: how to handle styling in your Helix solution.
There are a lot of different ways you can handle styling in Sitecore. At TechGuilds, we wanted a solution that would best reflect the spirit behind the Helix architecture, mindful of the three layers - Foundation, Feature, Project - and their dependencies. We also wanted to make sure that our code was as modular as possible, keeping all relevant code, including styling, together. In previous solutions, we utilized SASS and kept all styling in one project on the Foundation layer, which had three sub-folders corresponding to the Helix layers. This was convenient because it eliminated the overhead that I’m about to walk you through, but it didn’t meet our need for modularity.
Fortunately, the overhead needed to compile styling from multiple projects in one solution isn’t that complicated, thanks to gulp.js. Gulp is a tool for automating “processes” (vague, I know) that runs on javascript. When I first heard of Gulp years ago, this actually confused me, as I didn’t quite get the use of javascript as an assistant to development rather than a means of development. However, javascript is a flexible language and node.js extends its functionality beyond web development.
For our purposes, gulp.js will act as a customizable extension to Visual Studio. When properly configured, it will compile and minify all of our SASS stylesheets from the different projects in our Helix solution into one .css file that can be invoked on a layout. It will do so automatically, any time one of the .sass files is changed and saved, and it will put the compiled stylesheets in the right place in the solution.
Getting familiar with Gulp will change the way you develop for Sitecore. Let’s get started.
Environment Setup
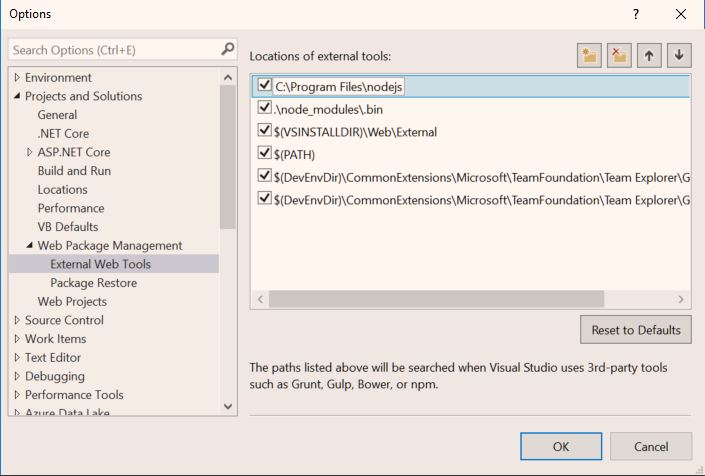
The first thing you need to do is make sure Node.js is installed on your machine, as Gulp relies on it to work. Next, we need to tell Visual Studio to use the version of Node you just installed. Go to Tools > Options, and open the menu for “Projects and Solutions,” then “Web Package Management,” then “External Web Tools.” You should see a list of paths with checkboxes next to them, including “.\node_modules\.bin”. We’re going to add the path to the installed version of Node.js here, which should be “C:\Program Files\nodejs” by default. After adding this path, move it to the top of the list using the arrow buttons. (Reference these instructions for a bit more detail).
Next, we’re going to make sure the “Open Command Line” extension is part of your Visual Studio. This allows you to right-click any part of your project in Visual Studio and open a command console or powershell window scoped to the correct directory in the file structure. If you don’t see the option for “Open Command Line” when you click on an item in the Solution explorer, download the extension using Nuget package manager.
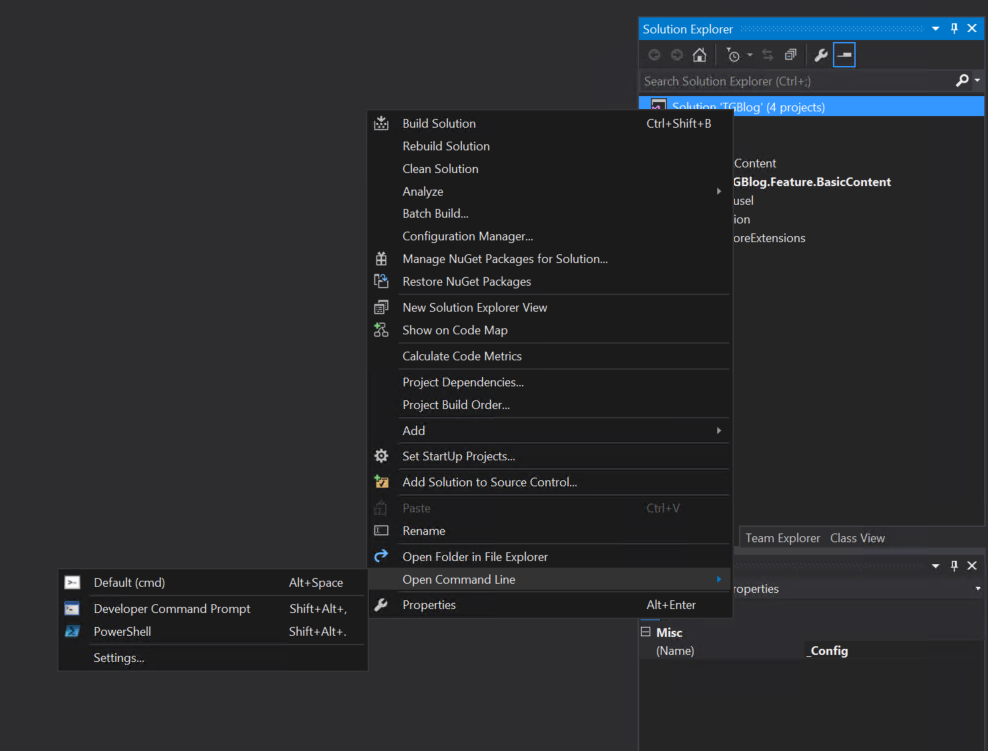
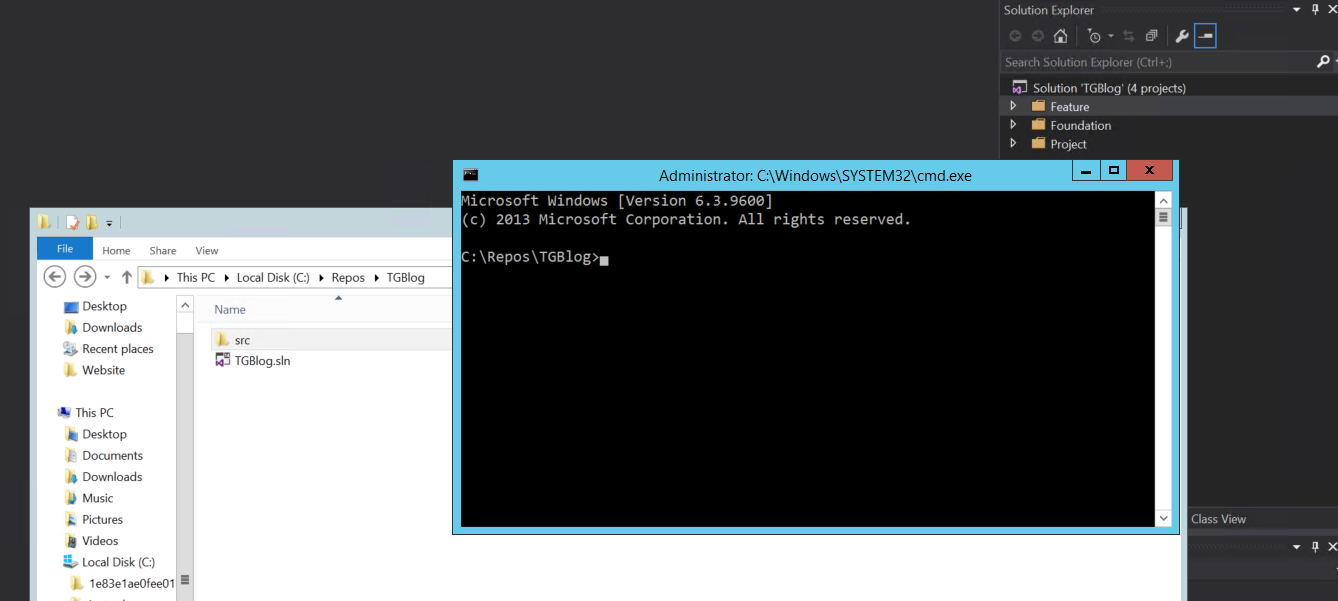
We’re going to install gulp.js in the root folder of your Helix solution, which contains your .sln file and your /src/ folder (which itself includes your Foundation, Feature, and Project folders). Right-click on the solution in the VS Solution Explorer and open a CMD window.
Now we’re going to install gulp. You can follow gulp’s quickstart guide, but MAKE SURE YOU SKIP the step that says “Create a project directory and navigate into it,” since we’re installing to the project root. When you run “npm init,” you can just go with the defaults. After following those steps, you should now have a “node_modules” folder inside your root folder. Create the gulpfile.js file in the same root folder, and test it using the “gulp” command in the same CMD window. Not much will happen, but you should see that the ‘default’ task ran.
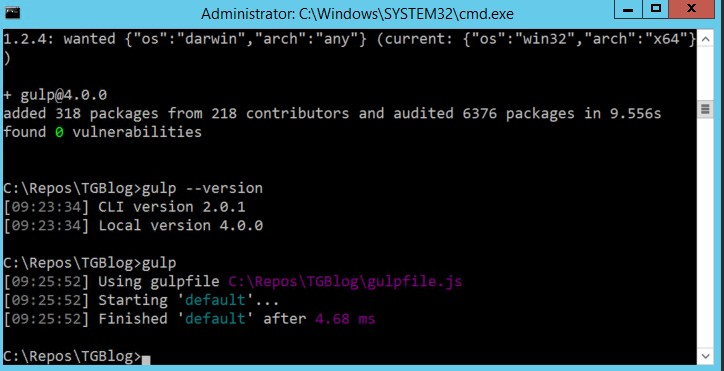
At this point the root folder in your solution should include a “node_modules” folder, gulpfile.js, package.json, and package-lock.json. You should be able to test gulp and see that it works.
Let’s formally add gulpfile.js to the solution. In the VS Solution Explorer, create a new folder and call it something like “Solution Items.” Right-click it and add an existing item, navigating to the gulpfile in the root folder.
To tie it all together, we’re going to open Visual Studio’s Task Runner Explorer by opening View -> Other Windows -> Task Runner Explorer. Alternately, we can open it by right-clicking gulpfile.js and selecting “Task Runner Explorer” from the context menu. In the Task Runner Explorer, you can see and run the functions defined in the gulpfile. This functionality is convenient because it prevents us from having to use the command console any time we want to do something with gulp.
But we’re not done with the command console yet.
Gulp Setup
Gulp has numerous plugins which extend its functionality. We’re going to install and use four of them: gulp-sass, gulp-concat, gulp-clean-css, and gulp-header. Each of these is installed in the same way, using npm and the command console (don’t be afraid of npm if you don’t have any experience with it yet, and feel free to read my guides on JSS/React to get familiar with it). These plugins install to the “node_modules” folder in the project root. The command to install each plugin follows the same syntax:
npm install [plugin name] --save-devGo ahead and install the aforementioned four modules using the syntax above (for example, the command to install gulp-sass will be “npm install gulp-sass --save-dev”). After you’ve installed the plugins, we need to add references to them in our gulpfile.js so we can use them.
Add the following code at the top of your gulpfile.js:
gulpfile.js:
//Dependencies
var gulp = require('gulp');
var sass = require('gulp-sass');
var concat = require('gulp-concat');
var cleanCSS = require('gulp-clean-css');
var header = require('gulp-header');
At this point, if the Task Runner Explorer has broken, something has gone wrong. Make sure Node.js is installed and you configured the Visual Studio options to use the recently-installed version first.
Now we can start writing some gulp tasks and compiling our styling. However, we need some styling to compile!
Styling
For the purposes of this example, I’m going to add some styling to a couple components that I made in previous posts: a basic content component and a carousel component.
The file structure is extremely important for gulp, so we need to make sure the styling is in the same place in each project in the solution. We’ll do this simply, adding an “Assets” folder to each project, then a “Styling” folder underneath each one of those.
To add a sass styling file (.scss) to the Styling folder, right-click the folder and navigate to Add -> New Item. Navigate to Visual C# > Web > Markup, and you should see an option for “SCSS Style Sheet (SASS)”. Name your new stylesheet after the component in question. (Note: if you prepend your .scss filename with the ‘_’ character, it will be designated as a partial and will be excluded from the compilation.)

Now we’ll actually add some styling. I’m going to do this very simply just for the purposes of our demo. I’m going to add a fixed width to the carousel, and I’m going to center the content of the basic content component.
basicContent.scss:
.content{
    display: flex;
    align-items: center;
    flex-direction: column;
}
carousel.scss:
.carousel-item{
    width: 500px;
    height: 400px;
    background-color: red;
}
Before picture:

Now for the fun part: getting the styling on the page. We’re going to use gulp to compile these .scss files into one .css file, then import that on our main layout.
Writing the Gulp tasks
In order for Gulp to compile the stylesheets, we need to tell our gulpfile where they live. We want to do this in a dynamic way so we don’t have to specify the specific path for every individual .scss file. To do so, we’re going to use “node globs,” which work in a similar way to regular expressions (but aren’t as complicated). Here is a good introduction to globs that I recommend you get familiar with. If you want to verify the form of your globs, I also suggest you use Globtester, a very handy tool for checking your syntax.
With node globs we begin to see just how flexible Gulp can be for Helix. For example, if we wanted to grab and process every .scss file in our Helix solution, we could do so with the following glob:
src/+(Feature|Foundation|Project)/*/code/Assets/Styling/*.scssTo illustrate how this might work, we can write a simple gulp task that uses this glob. First, make a folder in your solution root called “testFolder”. Then, copy this extremely simple gulp task to your gulpfile:
gulpfile.js:
gulp.task('sass', function () {
    return gulp.src('src/+(Feature|Foundation|Project)/*/code/Assets/Styling/*.scss')
        .pipe(gulp.dest('testFolder'))  //outputs file in destination folder
});
This gulp task is called ‘sass’, it uses the glob from above, and it puts its processed output in the testFolder you created. Run this task using Task Runner Explorer (it should show up there after you save your gulpfile). You should see an output window showing you that the ‘sass’ task ran. Look in testFolder: you should see that the file structures containing the .scss files from earlier have been replicated, complete with copies of the .scss files themselves. For our purposes, this is only useful as an example to show how gulp’s input and output work. We still need to compile our .scss files and concatenate them into one .css file. So let’s put our plugins to work.
First, let’s plan out our architecture. Between Helix, Gulp, and SASS, there are a lot of ways you can architect your styling solution. Instead of writing one Gulp task that compiles and concatenates all of our .scss files, I’m going to write tasks that compile styling for each layer - project, feature, and foundation - then a task that combines the compiled stylesheets. First, let’s break down the feature-layer task:
gulpfile.js
var featurePath = 'src/feature/*/code/Assets/Styling/*.scss';
var styleRepo = 'styleRepo';

//Compile Feature level files
gulp.task('feature-sass', function () {
   return gulp.src(featurePath)
       .pipe(sass())
       .pipe(concat('feature.css'))
       .pipe(header('/* FEATURE STYLING */'))
       .pipe(gulp.dest(styleRepo))
});
The first thing you’ll notice is that I created a variable called “featurePath” that stores the glob/path for all feature layer styling. I keep all such variables in a “//Config” section at the top of my gulpfile, under “//Dependencies”. I also created a new folder in our solution root to replace the “testFolder” from earlier, called styleRepo, then created a variable to reference this folder. Go ahead and do the same thing, deleting your testFolder and creating a styleRepo folder.
The gulp task, called “feature-sass”, uses the feature-layer path to grab the .scss files from each feature component. It then processes these files through our plugins, using “.pipe”. The first plugin that processes our stylesheets is gulp-sass, which compiles them into .css files. Next, gulp-concat combines the compiled .css files into a single .css file called “feature.css”. After that, gulp-header adds text to the beginning of our file that says “/* FEATURE STYLING */” (this header can say anything you want). Finally, it outputs the compiled and concatenated file to our styleRepo folder, to be used later when we compile the helix layer stylesheets into one. Go ahead and copy this code to your gulpfile, save, run the task in the Task Runner Explorer, and check your styleRepo folder. There should be a single file in there called feature.css, which includes the styling from basicContent.scss and carousel.scss.
feature.css:
/* FEATURE STYLING */.content {
  display: flex;
  align-items: center;
  flex-direction: column; }

.carousel-item {
  width: 500px;
  height: 400px;
  background-color: red; }
>That’s a step in the right direction but we’re not done yet. We want ONE stylesheet that combines all three helix layers, and we want to put that file in the right place in our solution. First, let’s write the gulp tasks for the other two layers. Our updated gulpfile will look like this:
gulpfile.js:
//Dependencies
var gulp = require('gulp');
var sass = require('gulp-sass');
var concat = require('gulp-concat');
var cleanCSS = require('gulp-clean-css');
var header = require('gulp-header');

//Config
var foundationPath = 'src/foundation/*/code/Assets/Styling/*.scss';
var featurePath = 'src/feature/*/code/Assets/Styling/*.scss';
var projectPath = 'src/project/*/code/Assets/Styling/*.scss';
var styleRepo = 'styleRepo';

//Compile Foundation level files
gulp.task('foundation-sass', function () {
    return gulp.src(foundationPath)
        .pipe(sass())
        .pipe(concat('foundation.css'))
        .pipe(header('/* FOUNDATION STYLING */'))
        .pipe(gulp.dest(styleRepo))
});

//Compile Feature level files
gulp.task('feature-sass', function () {
    return gulp.src(featurePath)
        .pipe(sass())
        .pipe(concat('feature.css'))
        .pipe(header('/* FEATURE STYLING */'))
        .pipe(gulp.dest(styleRepo))
});

//Compile Project level files
gulp.task('project-sass', function () {
    return gulp.src(projectPath)
        .pipe(sass())
        .pipe(concat('project.css'))
        .pipe(header('/* PROJECT STYLING */'))
        .pipe(gulp.dest(styleRepo))
});
When you run any of these tasks in the Task Runner Explorer, it will produce a stylesheet in the styleRepo folder as long as there are .scss files in the correct place in the respective layer.
Let’s write a task now that combines and minifies our CSS:
var stagingStyles = [styleRepo + '/foundation.css', styleRepo + '/feature.css', styleRepo + '/project.css'] //Helix styling layers, in proper order

//Concatenate foundation, feature, and project layer, then minify
gulp.task('helix-sass', function () {
    return gulp.src(stagingStyles, { allowEmpty: true }) //use foundation, feature, project styling
        .pipe(concat('helix-styling.css'))  //concatenate all three styling files into one
        .pipe(cleanCSS())                   //minify
        .pipe(header('/* THIS IS A GENERATED FILE */'))
        .pipe(gulp.dest(styleRepo))        //output to folder
});
Here again I start with creating a variable that stores the input path for our gulp task, except this time it’s an array. The task itself is called “helix-sass”, and the gulp.src statement includes the {allowEmpty: true} parameter so that the process doesn’t crash if project.css, feature.css, or foundation.css doesn’t exist for whatever reason. Because these files are already compiled into .css files, the first thing this task does is concatenate them all into a single .css stylesheet. It then uses gulp-clean-css to minify the stylesheet. As in the previous tasks, this also adds a header, this time as a warning that helix-styling.css is a generated file. Finally, it outputs the stylesheet to our styleRepo. We’re going to change this last part in a second, but first go ahead and run this task and check your styleRepo folder to make sure that helix-styling.css is there and includes all of the (minified) styling in your solution.
Using Partials
In SASS, partials are .scss stylesheets that can be imported into other .scss stylesheets, allowing for greater modularity and division of code. Helix architecture adds a wrinkle to this process, as a partial in one project can’t be referenced by a stylesheet in another project automatically. We need to change our gulp tasks just a bit to account for their use.
Let’s say you want to use SASS variables in your project. One way to do this might be to add the variable designations on the foundation layer, then import them on the lower dependent layers.
As an example, I’ll add a file called “_variables.scss” to the Styling folder in my SitecoreExtensions project on the Foundation Layer (I created this project in my post about adding rendering chrome to the Experience Editor). The “_” character designates this stylesheet as a partial and prevents it from being compiled by our gulp tasks. In this stylesheet I’m going to designate some SASS variables, like so:
_variables.scss:
$primary-color: purple;
$secondary-color: red;
$tertiary-color: magenta;
If I then want to use these variables in another stylesheet, I’ll need to import _variables.scss first. Let’s do this for our carousel:
carousel.scss:
@import '_variables.scss';

.carousel-item{
    width: 500px;
    height: 400px;
    background-color: $secondary-color;
}
Typescript won’t like this because the _variables stylesheet is in another project. But forget Typescript. Let’s worry about Gulp. We need to alter our gulp tasks to include our partials in our sass compilation. Fortunately this is a fairly simple change. We just need to add a parameter to our gulp-sass .pipe statement that includes the path to our partial. Like so:
gulpfile.js:
//Compile Feature level files
gulp.task('feature-sass', function () {
    return gulp.src(featurePath)
        .pipe(sass({
            includePaths: ['src/foundation/SitecoreExtensions/code/Assets/Styling/']
        }))
        .pipe(concat('feature.css'))
        .pipe(header('/* FEATURE STYLING */'))
        .pipe(gulp.dest(styleRepo))
});
Because includePaths is an array, you can add as many paths as you need. I recommend doing this for each Helix layer task.
Adding the Stylesheet to the Solution
Okay, now let’s actually add this compiled stylesheet to our solution. The first thing we need to figure out is where it should go. Helix methodology recommends that final styling for the whole solution should live in the project layer, so I’m going to put it in the Website project we created in Back to Basics Part 1. This location will be a static path:
src/Project/Website/code/Assets/StylingCreate a variable in the “//Config” section of your gulpfile called “prodOutput”, and assign it the above string. Then, change the output destination in the “helix-sass” task from styleRepo to prodOutput. Save and run the task.
Finally, in the Solution Explorer, right-click the Styling folder in the Website project and add an existing item, navigating to helix-styling.css (alternately, you can select “show all files” in the Solution Explorer and include helix-styling.css in the project). You’ll never edit this file directly.
Automation
One of Gulp’s greatest strengths comes from its ability to automate the execution of its tasks. These are called “watch” tasks, and they execute designated tasks when designated files are changed. For our purposes we want our helix-styling.css file to regenerate whenever we edit and save any of the .scss stylesheets in our projects. Here’s how you would do that:
var stylingPath = 'src/+(Feature|Foundation|Project)/*/code/Assets/Styling/*.scss';

//Automate compilation of sass files
gulp.task('helix-watch', function () {
    gulp.watch(stylingPath, gulp.series('foundation-sass', 'feature-sass', 'project-sass', 'helix-sass'));
});
As with the other tasks, I first create a variable here that stores a node glob, this time in order to designate the files our task will be watching. Inside our task, our gulp.watch statement takes this path, then designates the tasks that should execute when any of the files in the glob are altered.
Now, whenever you alter and save a .scss stylesheet in a Helix project, the layers will recompile, concatenate, and minify.
The only catch is that you need to make sure to run the “helix-watch” task in the Task Runner Explorer before you start editing your stylesheets, otherwise this process won’t run automatically. You’ll also need to restart this task any time you change the gulpfile.
Here’s our final gulpfile:
//Dependencies
var gulp = require('gulp');
var sass = require('gulp-sass');
var concat = require('gulp-concat');
var cleanCSS = require('gulp-clean-css');
var header = require('gulp-header');

//Config
var foundationPath = 'src/foundation/*/code/Assets/Styling/*.scss';
var featurePath = 'src/feature/*/code/Assets/Styling/*.scss';
var projectPath = 'src/project/*/code/Assets/Styling/*.scss';
var styleRepo = 'styleRepo';
var stagingStyles = [styleRepo + '/foundation.css', styleRepo + '/feature.css', styleRepo + '/project.css'] //Helix styling layers, in order
var prodOutput = 'src/Project/Website/code/Assets/Styling';
var stylingPath = 'src/+(Feature|Foundation|Project)/*/code/Assets/Styling/*.scss';

//Compile Foundation level files
gulp.task('foundation-sass', function () {
    return gulp.src(foundationPath)
        .pipe(sass({
            includePaths: ['src/foundation/SitecoreExtensions/code/Assets/Styling/']
        }))
        .pipe(concat('foundation.css'))
        .pipe(header('/* FOUNDATION STYLING */'))
        .pipe(gulp.dest(styleRepo))
});

//Compile Feature level files
gulp.task('feature-sass', function () {
    return gulp.src(featurePath)
        .pipe(sass({
            includePaths: ['src/foundation/SitecoreExtensions/code/Assets/Styling/']
        }))
        .pipe(concat('feature.css'))
        .pipe(header('/* FEATURE STYLING */'))
        .pipe(gulp.dest(styleRepo))
});

//Compile Project level files
gulp.task('project-sass', function () {
    return gulp.src(projectPath)
        .pipe(sass({
            includePaths: ['src/foundation/SitecoreExtensions/code/Assets/Styling/']
        }))
        .pipe(concat('project.css'))
        .pipe(header('/* PROJECT STYLING */'))
        .pipe(gulp.dest(styleRepo))
});

//Concatenate foundation, feature, and project layer, then minify
gulp.task('helix-sass', function () {
    return gulp.src(stagingStyles, { allowEmpty: true }) //use foundation, feature, project styling
        .pipe(concat('helix-styling.css'))  //concatenate all three styling files into one
        .pipe(cleanCSS())                   //minify
        .pipe(header('/* THIS IS A GENERATED FILE */'))
        .pipe(gulp.dest(prodOutput))        //output to folder
});

//Automate compilation of sass files
gulp.task('helix-watch', function () {
    gulp.watch(stylingPath, gulp.series('foundation-sass', 'feature-sass', 'project-sass', 'helix-sass'));
});
Conclusion
The only step to take now is to add our new stylesheet to our main layout. If you’ve read Back to Basics Part 1 and my post about adding Rendering Chrome to the Experience Editor, you know that I have a single layout file called MainLayout.cshtml in my Website project. The latter blog post involved creating a stylesheet and importing after a Bootstrap CDN call, but because I’ve combined that stylesheet into our master compiled stylesheet, I’m going to replace that reference. MainLayout.cshtml now looks like this:
@using Sitecore.Mvc
@using Sitecore
@{
    Layout = null;
}

<!DOCTYPE html>

<html>
<head>
    <meta name="viewport" content="width=device-width, initial-scale=1, shrink-to-fit=no" />
    <title></title>
    <!-- Styling -->
    <link rel="stylesheet" href="https://stackpath.bootstrapcdn.com/bootstrap/4.1.3/css/bootstrap.min.css" integrity="sha384-MCw98/SFnGE8fJT3GXwEOngsV7Zt27NXFoaoApmYm81iuXoPkFOJwJ8ERdknLPMO" crossorigin="anonymous">
    <link href="~/Assets/Styling/helix-styling.css" rel="stylesheet" />
    <!-- Javascript -->
    <script src="https://code.jquery.com/jquery-3.3.1.slim.min.js" integrity="sha384-q8i/X+965DzO0rT7abK41JStQIAqVgRVzpbzo5smXKp4YfRvH+8abtTE1Pi6jizo" crossorigin="anonymous"></script>
    <script src="https://stackpath.bootstrapcdn.com/bootstrap/4.1.3/js/bootstrap.min.js" integrity="sha384-ChfqqxuZUCnJSK3+MXmPNIyE6ZbWh2IMqE241rYiqJxyMiZ6OW/JmZQ5stwEULTy" crossorigin="anonymous"></script>
</head>
<body class="@(Sitecore.Context.PageMode.IsExperienceEditorEditing ? "edit-mode" : string.Empty)">
    <div class="container">
        <div class="row">
            <div class="col-xs-12">
                @Html.Sitecore().Placeholder("main")
            </div>
        </div>
    </div>
</body>
</html>
Go ahead and publish your Website project, or just deploy the stylesheet and layout. Here’s what our test website looks like now:

That’s it! You’ve mastered using Gulp for Helix styling. However, Gulp can be used for much, much more, including compiling javascript or even building all of the projects in your Helix solution at once. I may end up writing guides for that functionality in the future. For now, let us know what you think of this post! Did you find it helpful? Difficult? Do you have any questions? Did we miss anything? Feel free to leave a comment below!