This post was originally published by Ken Gray on November 16, 2018 and was edited by Hector Chen on February 2, 2022.
Welcome to the second part of the Scheduled Publishing and Advanced Publishing with Sitecore post which is a segment in the Productivity Tips for Sitecore Content Authors and Experience Marketers article series.
In Part 1 of the Sitecore Advanced Publishing, I covered the following areas:
- Sitecore Publishing Best Practices
- Publishing Through Sitecore’s Workflow (Sample)
- Manual Publishing
If you haven’t read the first part, I highly recommend reviewing the Sitecore Publishing Best Practices part of it.
In this post, I’ll be covering some caveats to publishing and removing content from a live website.
Auto-publishing vs Scheduled Publishing
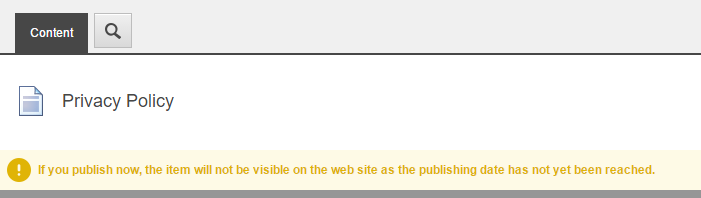
Out-of-box, it appears that you can simply set the Publish date/time and Unpublish date/time, and Sitecore will automatically publish content to your live website; or remove it when the time comes. Seems reasonable and logical right? However, that is not the intended purpose for the Publish and Unpublish dates.
Think of the Publishing and Unpublishing date/time fields, as “scheduling” or “queuing” content for a future publish action. In other words, a “manual” publish still needs to be executed.
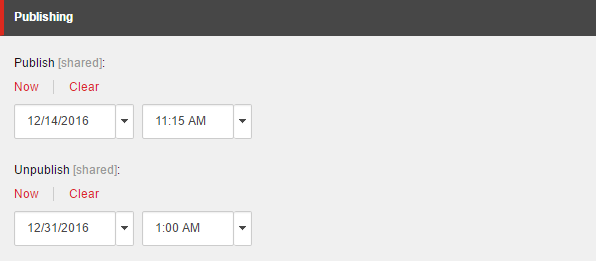
If the current date/time falls out of the item's publishing date/time range, publishing the item will do one of the following:
- if the publishing date has not yet been reached, publishing the item will not make it visible on the website.
- if the item is already on the website and the unpublishing date has been reached, publishing the item will remove it from the website.
Essentially, the Publish date/time restricts and adds more assurance, that an item won’t be accidentally published before it’s time; or removes an item from the site when the Unpublish date/time has been reached.
Here are the options for automatically publishing content:
- Download the AUTOMATED PUBLISHER module from the Sitecore Marketplace.
- See below for instructions on how to use it.
- Have your Sitecore implementers write your own custom code that is triggered by a Sitecore Task.
- Schedule content items for publishing and manually perform a Site publish at specific intervals (e.g. twice a day).
- See our post on Content Governance.
- It’s not really automated, but a manual site publish will push and remove ALL content from the live website based on the specified publishing date range.
Unpublishing or removing content
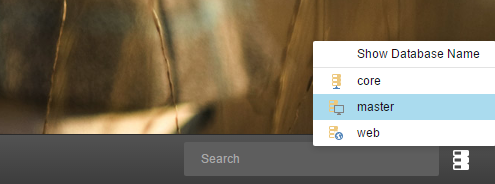
A common mistake I see content authors make is thinking that deleting an item from the content tree also removes it from the website. This is not the case, because Sitecore uses multiple databases to manage and present content. By default, Sitecore uses the following three databases:
- The Master database; for all content storage and management tasks.
- The Web database; where only published content resides and is made visible to website visitors.
- The Core database; used for security and the inner workings of Sitecore along with its configuration.
Depending upon your access level you can switch between these databases and view their content tree items through the Sitecore Desktop interface.
In the lower-right-hand corner you will see the icon next to the search box which, when clicked, displays the list of available databases with the active one highlighted.
Resolving 'deleted content, but still visible on the live website' issues:
If you ever find yourself in a position where content has been deleted from the content tree, but is still displaying on your website and needs to be removed, try one or more of the following:
- Attempt to restore the deleted item using the Sitecore Recycle Bin.
- Publish the parent item of the one that was deleted. Sitecore will sync the Web database with the Master database, therefore removing it from the website.
- Open the Web database and delete the item that is not required (use caution because you are editing the live website whenever you work in the Web database).
Best practice for unpublishing and deleting content:
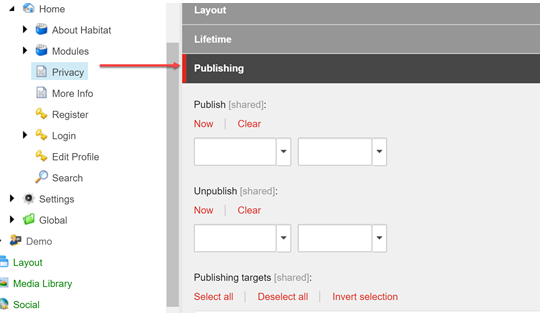
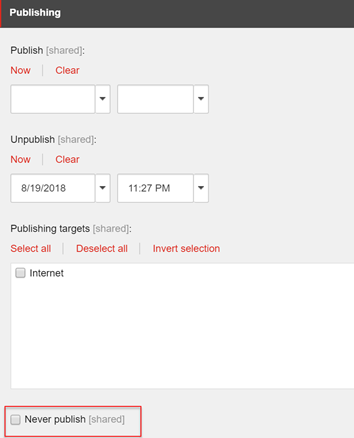
- Select the item to be unpublished scroll down to the Publishing section in the Content Work Area.
- Click the Now option under Unpublish to set the date and time for immediate unpublishing.
- Save and manually publish the item to remove it from the website.
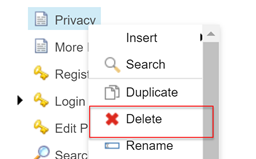
- If desired, Delete the item from the content tree by right-clicking the item and choosing Delete from the context menu.

Notes:
- If an item is deleted accidentally and still available on the site, use the Sitecore Recycle Bin to recover it.
- If the recycle bin recovery doesn’t work, a user with sufficient privileges can recover the item by visiting the Web database and using the Control Panel to move an item to another database (namely the Master).
Restricting publishing
As mentioned previously, setting the Publish/Unpublish dates can restrict publishing depending upon where the dates fall in comparison to the current calendar date.
You can also explicitly restrict publishing on content items as follows:
- You can set the Never Publish checkbox for an item
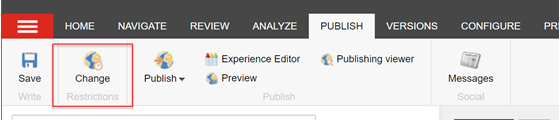
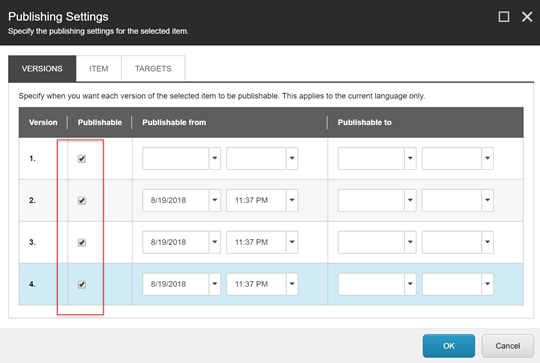
- Use the Change Restrictions button on the Publishing tab; this also allows you to restrict publishing for certain versions
Lastly, you can use Sitecore Security, to remove all access rights, so the item can’t be edited or published – a bit extreme, but it works 😊
Auto Publish Module
By far, the easiest way to get true automatic publishing, is with this existing Auto Publish Module found in the Sitecore marketplace. https://marketplace.sitecore.net/en/Modules/A/Auto_Publish.aspx
This module helps in publishing and or removing items at a specific date and time. The module will, upon saving an item, check if there are any publishing restrictions set and create Scheduled Tasks for the Start Date/Time and the End Date/Time (if applicable).
By default, the module will check once per minute to see if any items, in the scheduled task list, are within the publishing window.
How to Schedule items to for Auto Publishing
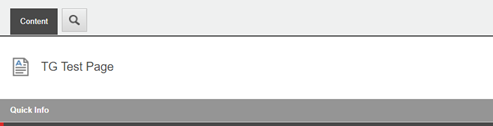
- Select the item you want to publish. In our case we’ve create a TG Test Page.
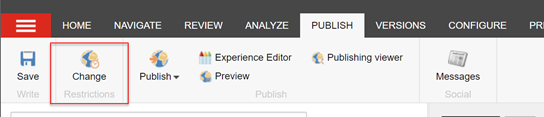
- Click on Publish in the menu and then click Change.
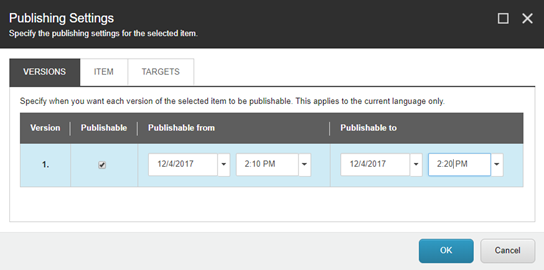
- Change the Publishable From and Publishable To dates as appropriate and click the OK button.
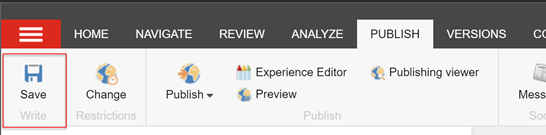
- Click Save to record the changes to the item which sets up the Scheduled Tasks for auto publishing.
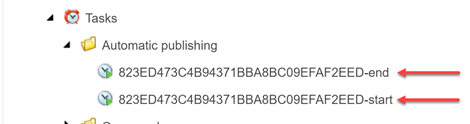
- There should now be new Tasks under the Automatic Publishing folder.
Note: If either of the dates, in Step #4, are left empty, then its related task will not be created, giving you the flexibility to either auto-publish and or auto-unpublish an item.